|
Watch as Laura from Garden Answer creates a beautiful planter for Fall using Flower-tone and Potting Soil Mix! Featured Products:
from Espoma https://www.espoma.com/gardening/fall-gardening/video-time-for-fall-wall-planters-with-garden-answer/ from https://summerblakeley.wordpress.com/2020/09/29/video-time-for-fall-wall-planters-with-garden-answer/
0 Comments
It’s never too early to teach your children about gardening! From learning about nature to developing patience, horticulture can benefit everyone, no matter their age. But it can be difficult to decide what your little gardener is capable of doing. We pulled together a list to help you get your whole family involved — just in time before the colder months take over. 1. Decorate flower pots
A great place to start is with potted plants. A benefit of this activity is that it works year-round — even when it’s too cold to be out in the garden. Let them express their creative side with a little acrylic paint on some clay pots. The acrylic will last long and hold up in harsh weather if you plan to keep them outside. With the upcoming holidays, you can encourage them to get festive with their designs and colors! 2. Grow some easy fall vegetables
Do your children know where the food they eat comes from? Use these last few months of warm weather to show them how their favorite veggies are grown. Fall plants like arugula, spinach, and kale can grow from a seed within a month! Your little one will be able to see for themselves how food makes its way to their plate, and they’ll feel super proud that their hard work helped it get there. 3. Plant future spring blooms
Ready to teach your little one about patience? Right now is the best time to plant spring perennials. Be sure to give your future flowers enough time to establish roots in warm enough soil before it gets too cold out. We recommend tulips and hyacinths since they actually need a period of cold weather in order to bloom later! Just don’t forget to help them along with some bulb-specific fertilizer. Your child will soon understand how hard work and patience pays off when your garden turns into a wonderland of flowers in the spring.
4. Carve pumpkins
It doesn’t feel like fall until you break out the pumpkins! But instead of carving them out as porch decorations, try to add a gardening twist this year. You can actually hollow them out and use them as biodegradable flower pots! This is a great time to teach your children about resourcefulness and composting. When you’re done with them, throw them into your fertilizer mix for your soil. 5. Let them decide
Gardening can be a very creative and personal hobby, so let your child have the freedom to explore and choose how they want the garden to look. Teach them what kinds of flowers and vegetables are able to grow at certain times of the year, but let them have the final say. It can also be helpful for you to have a second opinion when you get in your own habits. You’d be surprised to see how it turns out! The only thing that can make your gardening hobby better is to get your loved ones involved — no matter how young they are. And it’s never too late in the season for them to jump in and help out! All you need is some patience and quality products to help you along the way. Even in the midst of winter, there are plenty of indoor plants that they can learn from in the meantime. Before you know it, they’ll be counting down the days until they can get outside and start gardening once spring comes around! Featured Products:
from Espoma https://www.espoma.com/fruits-vegetables/uncategorized/5-ways-to-get-your-children-involved-in-gardening/ from https://summerblakeley.wordpress.com/2020/09/28/5-ways-to-get-your-children-involved-in-gardening/
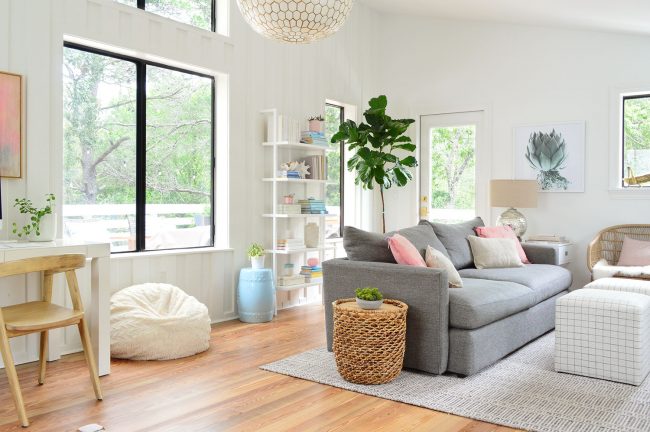
While putting together our house’s before & after page and paint color/source page last week, we realized that the photos for a couple of rooms were already looking out of date. One notable example was our upstairs family room, which has gotten a few important additions since we first shared it back in July. Can you spot them? sofa | similar rug | chair | desk | ottomans | wall bookcase | blue drum stool | similar basket table | chandelier | similar beanbag | similar art Probably the most prominent update is the addition of this oversized capiz globe light that has literally been in Sherry’s mood boards and Pinterest pages for years. It’s probably one of Serena & Lily’s most well-known designs, but we’ve never had a spot where it made sense (or could fit!). That is until we found ourselves owning this living room with generous vaulted ceilings (they’re around 10′ tall at the peak). Continue reading We’re Finally Taking Advantage Of Our Tall Ceilings! at Young House Love. from Young House Love https://www.younghouselove.com/living-room-light-update/ from https://summerblakeley.wordpress.com/2020/09/24/were-finally-taking-advantage-of-our-tall-ceilings/
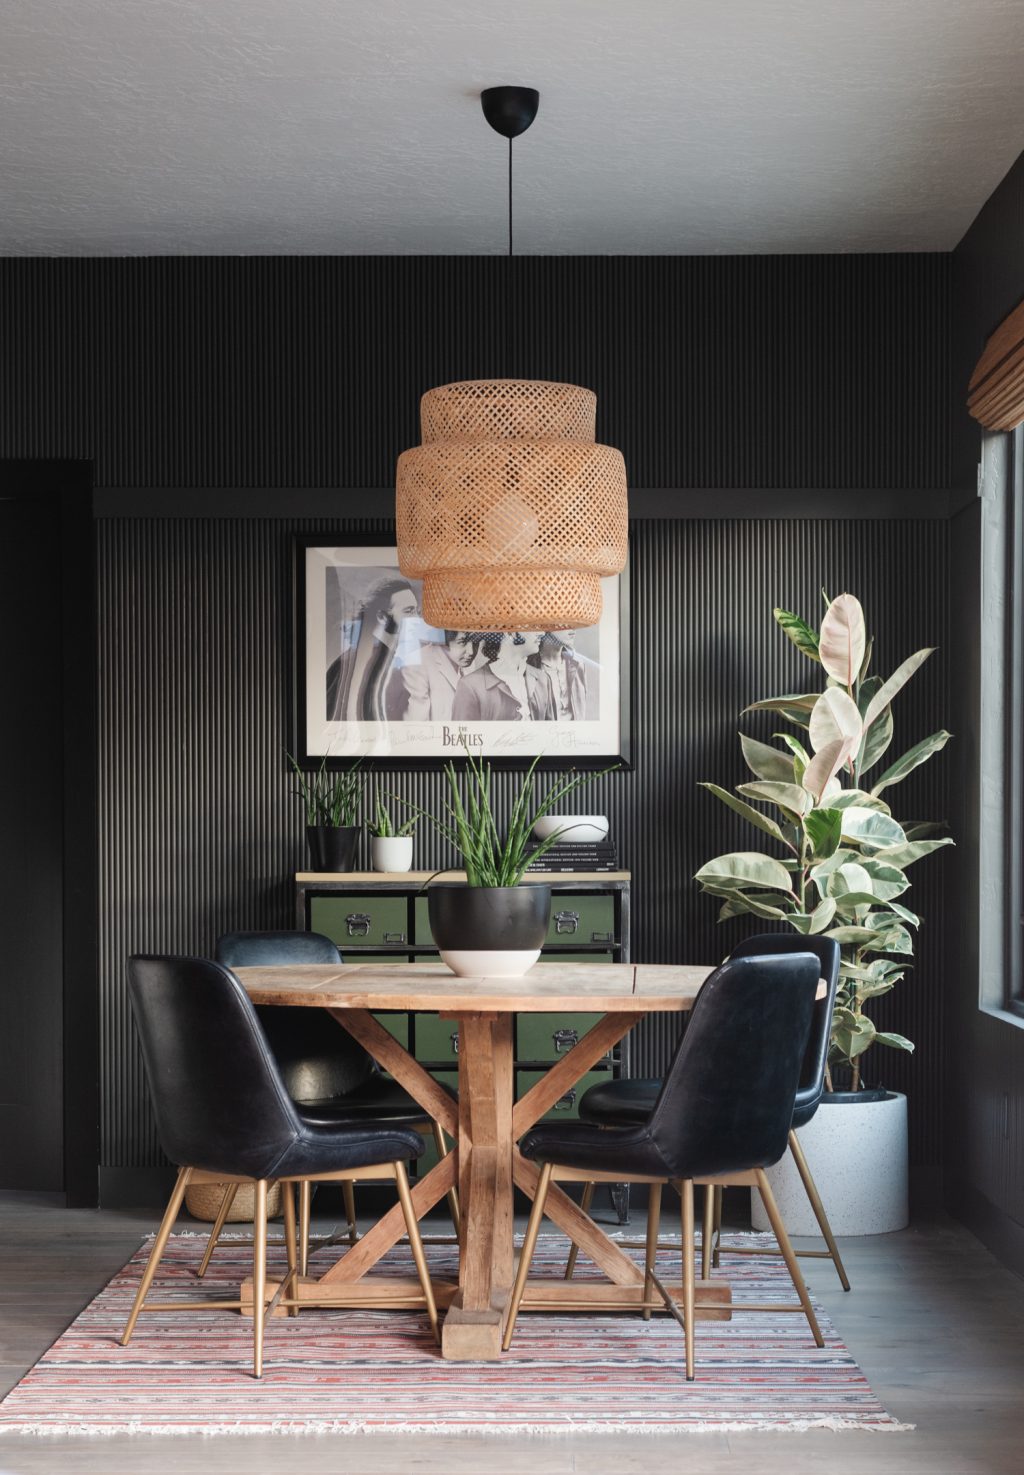
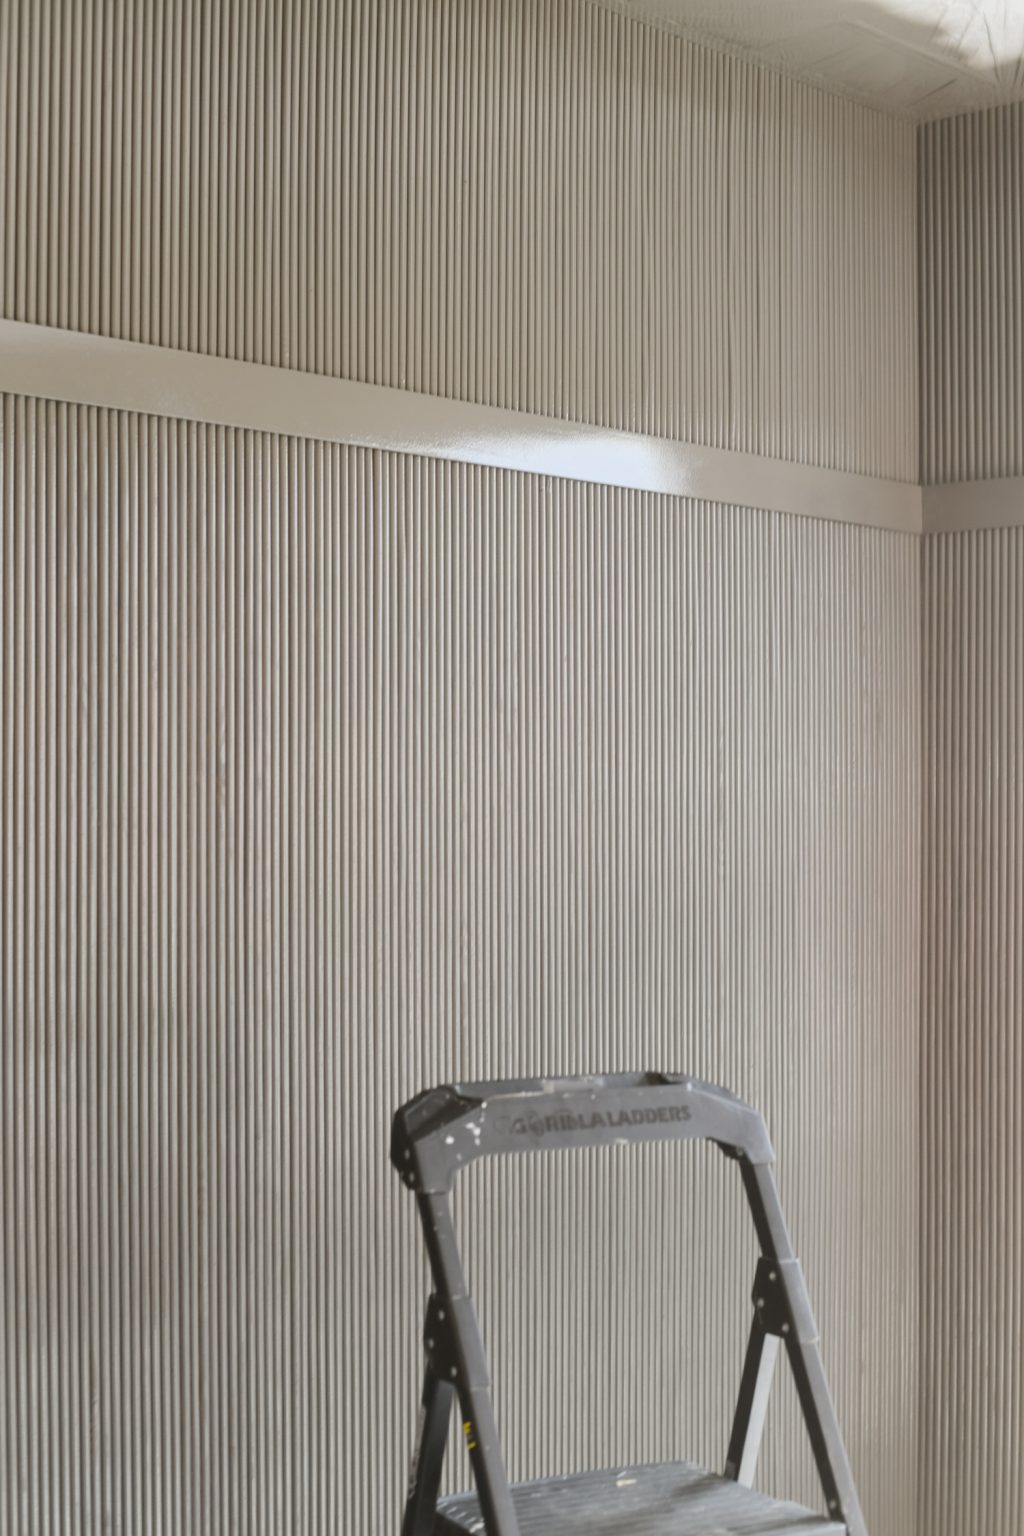
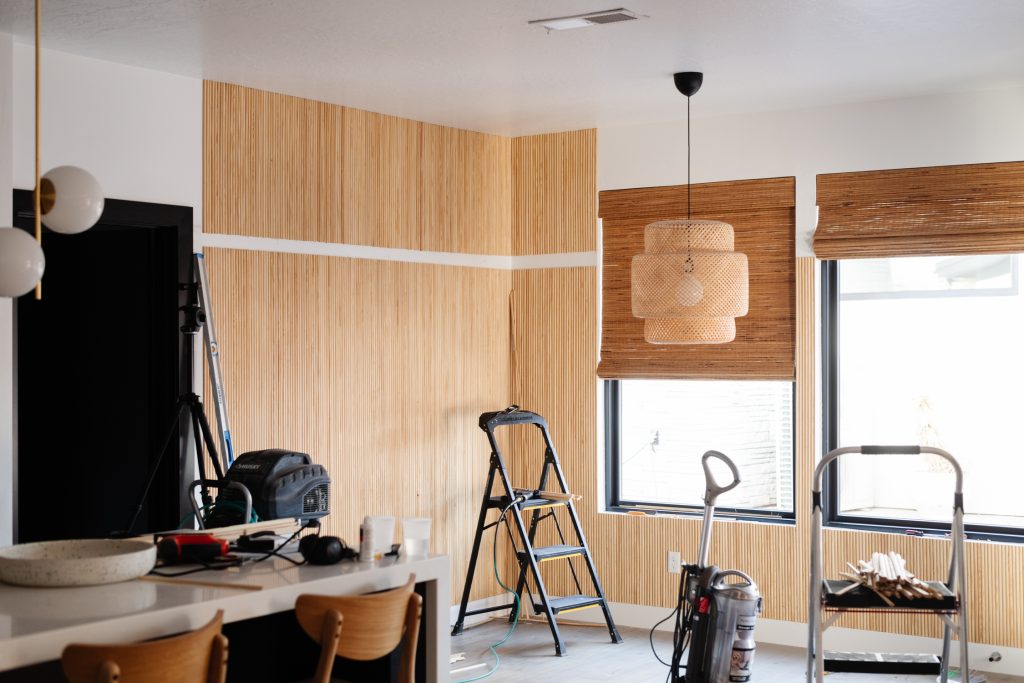
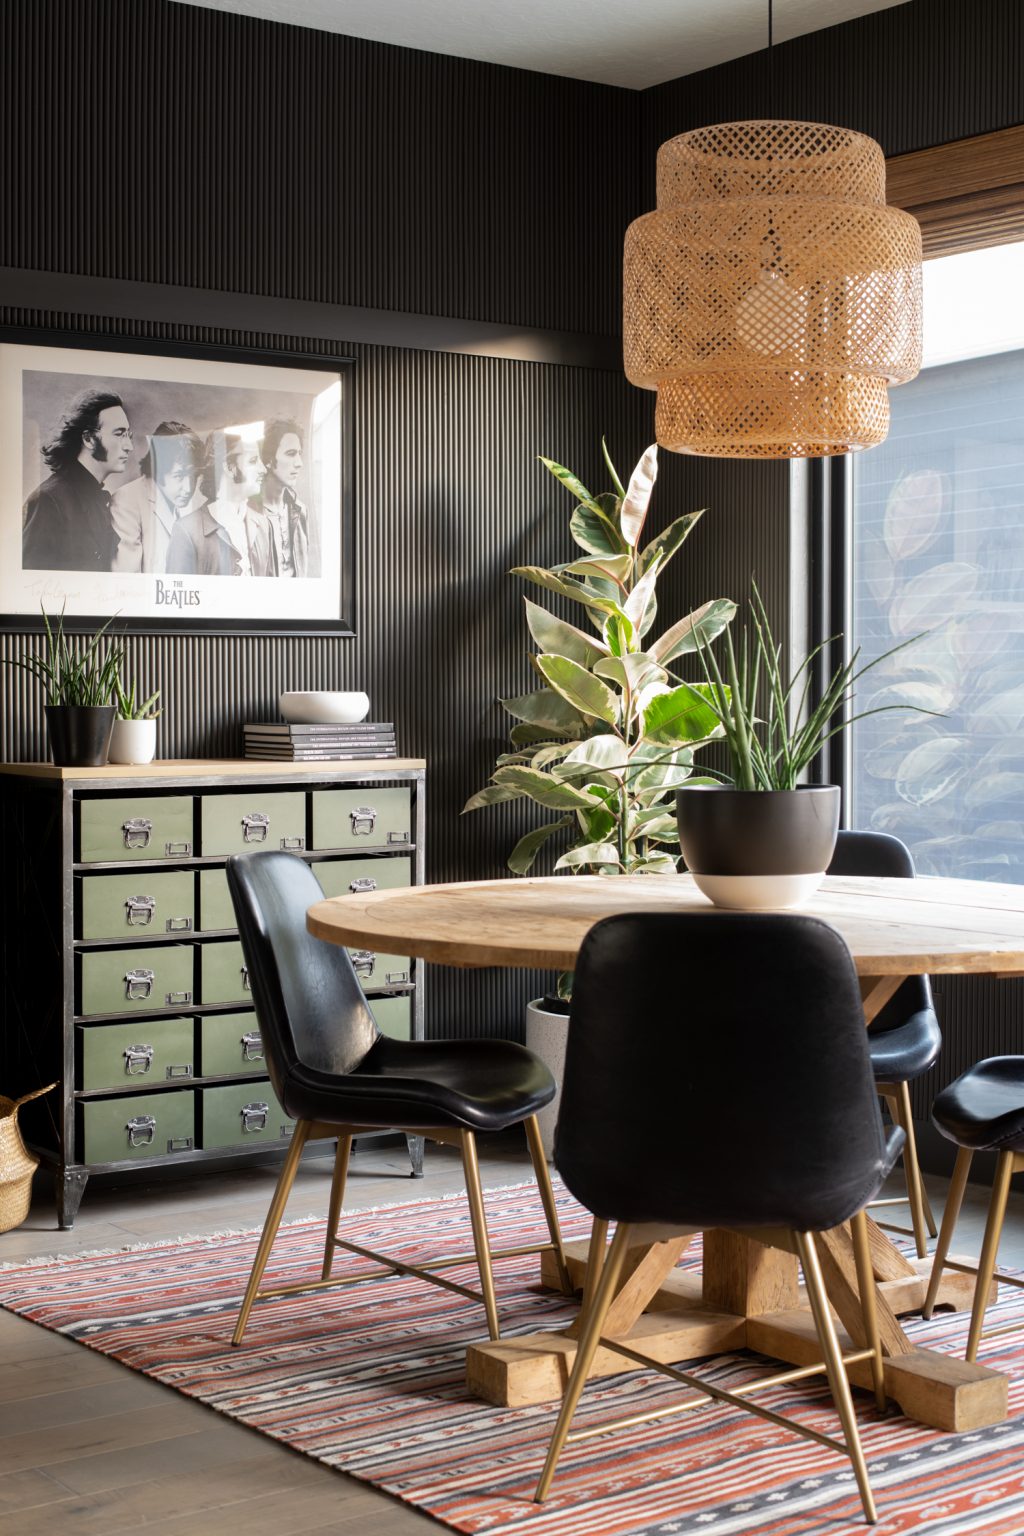
You guys know I love a good wall treatment, but I dont know if I have ever loved a wall treatment as much as I love this Fluted wall. It is an absolute labor of love, so settle in because if you are going to DIY this fluted wall treatment you’ve got to have stamina. Fluting is a type of molding finish where half round, or rounded pieces of molding are repeated over and over. We’ve seen slat walls take the DIY world by storm over the last few years, this is the more refined version of that. Fluted walls/furniture/etc. can pull either very boho and a little 80’s or more traditional like ours. It all depends on how it’s styled and the color of the wall!
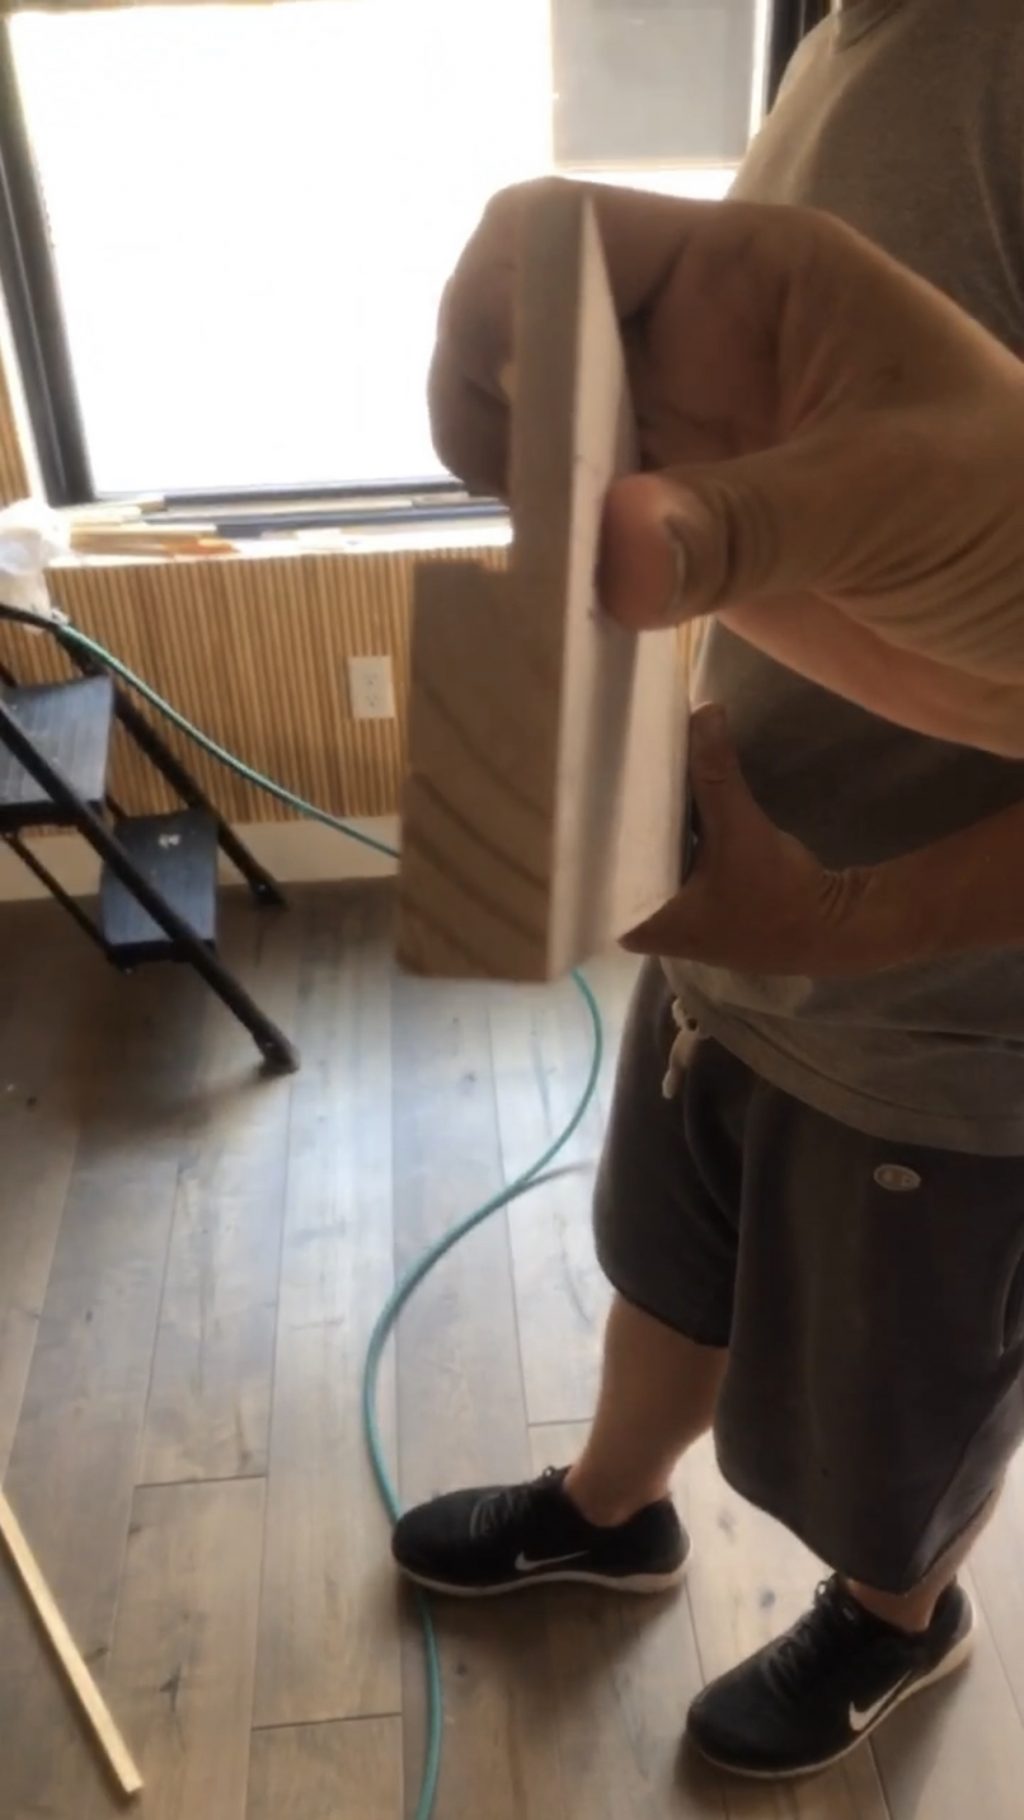
It’s a texture that you are magnetically pulled to, you cant help but run your hand along it. Like I mentioned before, it’s not a hard process, it’s just really tedious-but SUPER worth it!! How to DIY a Fluted Wall TreatmentYou’ll need: Half Round molding Where to buy half round moldingTracking down half round molding is probably going to be the hardest part of this project. Not because it’s hard to find, but because it seems to be sold out everywhere! Home Depot only sells half round trim online, they dont have it in stock (at least not in Utah/Nevada) Ordering online is obviously super easy because it’s shipped directly to your door. Lowes only has half round trim in store. They dont have an option to purchase it online. You might be able to order mass quantities from the pro desk, I would check! You guys know I am a Home Depot girl through and through, but we had a quick turnaround on our project, so I drove to Vegas and singlehandedly cleared out 7 stores. Pick your poison depending on your bandwith and project turnaround time. How much half round trim will I need to flute a wall?This my friends is the million dollar question. Well, not million, but definitely a couple thousand. One great thing about buying molding from a large retailer like Home Depot or Lowes is that you can return the left overs. If you want to figure out how much you’ll need, start by taking the total wall width and times it by the width of your molding (ours was 11/16″) Where things can get hairy is adding extra footage to compensate for the ceiling height (our ceiling was 11″ longer than the 8′ trim piece) and subracting the spacing for windows and doors.
Give me all the geometry type math, but this kind? Nope. So like I said earlier, I cleared out 7 stores. Some had 30 pieces, some had 100. Total I ended up buying 442 pieces, and we used about 400 of them and returned the rest. At $3.92/piece this wall treatment was around $1700. You guys know I am ALL ABOUT doing things as inexpensively as possible and I ran through a few different scenarios. Buying full round pieces and ripping them in half, running cut pieces through the router, I even toyed with the idea of reaching out to the company that made our custom molding for our front doors at the Merc. But ultimately, buying precut half rounds was the most inexpensive strategy to get the look I wanted. If you come up with a better option please let me know and I will update this post!! How to install a fluted wall treatmentOne of the hurdles we faced with our walls ended up making the treatment 500% better! The pieces of molding were 8 feet long. Our ceiling height was just over 9′. In order to mask a seam, and not have to putty+sand+curse every single one of the dowels, we added a 4″ horizontal piece that went all the way around the room. This gave our molding something to die into and we were able to mask the seam situation.
And honestly, it makes the space dont you think?! Because we were making this up as we went, we learned some great lessons along the way! So forgive me if my pictures arent as chronological as my instructions. Step 1: Set the horizontal trim piece heightFirst thing we did was set our 4″ horizontal piece. I set it at a height where the off cuts from the molding could be used in a different section of the room (underneath the windows!) With molding that expensive, I was not about to waste it because of a dumb measurement mistake. Of course everyone’s house is different, but my tip for this is to measure down at least 4″ from the top of the door casing.
After we installed the entire lower portion of moulding on the walls and were frustrated and overwhelmed at the thought of custom cutting the entire upper section, Court came up with a genius idea. On this horizontal trim piece, we cut out a corner that the dowels can sit behind so we didnt have to measure them all perfectly! I didnt get a great shot of it, but this screenshot from our Instagram Stories gives you an idea! So if you are doing an upper section, I would HIGHLY recommend doing this, and doing it before you install it on the wall!
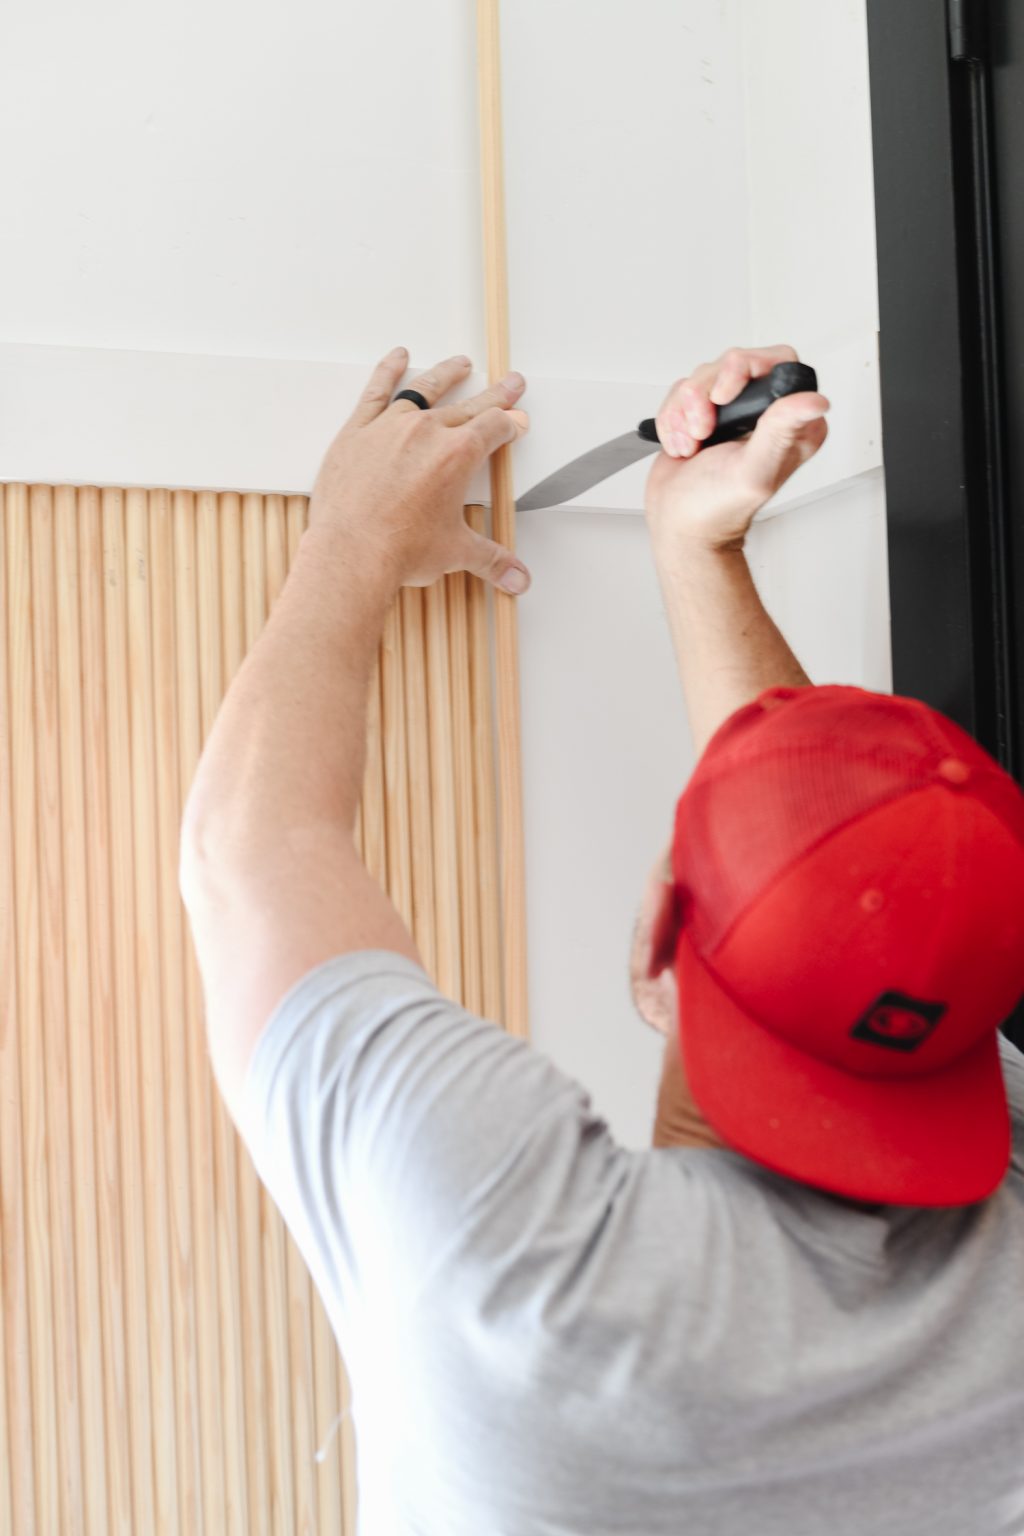
Step 2: Level and install the first piece of half round moldingOnce your horizontal piece is installed it’s time to set the first piece of half round. This is SUPER IMPORTANT SO LISTEN UP!! Do not install the molding directly against your door casing/wall unless it is perfectly level. In our case, the casings were not (this will probably be the case in your house too!) So we pulled the first piece off the casing just a little and leveled the half round. If you skip this step, your ENTIRE wall treatment will be crooked. If you have a gap between the molding and the casing/wall I would love to be the first to welcome you into the “no one is going to notice but you” club. And even then, when you paint the wall you wont notice. Trust me on this. Scroll down to the picture below this one, I bet you didnt even notice the gap.
Step 3: Install half round for the next 37 daysOk not really 37 days, but you are going to be in it for a while. The floors at my MIL’s arent level, so I cut and installed pieces in groups of 10, that way I could adjust as I needed to. I set up a stop on the saw to make them the same and adjusted that as needed. I will say, we had a learning curve trying to figure out the best way to cut the molding.
Here’s why. The pieces themselves are super long and floppy, and a lot aren’t straight (which doesnt really matter because they are so thin you can straighten them as you are attaching them to the wall). Even using a stop, we had to adjust them manually. We also tried marking them with a pencil, which was great but because they had to fit perfectly, Court couldnt cut the ones I marked (I always mark a little short and cut at the end of the mark leaving it on the wood and Court marks it long, removing the mark completely when he cuts). In the end after the first full wall was done Court ended up using a knife to mark and cut the rest of the tall pieces while I installed the pieces around the windows. Is a knife the best technique? Probably not, but you’ll figure out the way that is best for you, I’m sure of it!
To nail the pieces in we used a pin nailer. Pin nailers are different than finish nailers and are an absolute necessity when doing a project like this. The nails that they use look just like a headless pin. They are TINY and leave extremely small holes. We used these for a few reasons, the biggest being that we didnt want to have to fill all of the nail holes. If we used a finish nailer we 100% would’ve had to do that. You can see the pin holes if you look close, but they are not something you’d notice. If you choose, you can absolutely fill them, but we just felt like the time commitment didnt impact the finished product that much. Step 4: Installing molding around windowsLike I mentioned earlier, I did some math to make sure that our off cuts werent wasted. They fit with room to spare around the windows. We tried a few ways of installing the molding above and below the windows (dumb stuff like measuring and cutting each one by hand) and ultimately found that installing them long and then trimming them off with a flush cut hand saw was miles faster and looked better.
Step 5: Clean up!Before it’s time to paint there are a few clean up things that need to happen. In doubtedly if you are putting in 5000 nails, one or two will have misfired. Pull those out. We also filled the nail holes in the horizontal pieces and moved all of the electrical outlets to the face of the molding. Step 6: Prep for paintA project like this is the exact type of project that you want to spray instead of roll or brush. The last thing you want is uneven or goopy paint in between the half rounds. The downside with spraying is that there is a huge amount of prep involved, especially in a house that is finished. But like everything else in this project, it is so worth the effort. Our go to gear when we have to tape something off are these pre-taped plastic painter rolls. They are a lot easier to manage than the paper + masking tape situation. We taped off the ceiling, floors, windows, doors, and light fixture. We also used a lot of regular masking tape. It holds stronger than painters tape and makes it easier to tent an entire room. The downside is that it can leave residue and pull up paint if it’s left on for too long. So keep that in mind!
Step 7: Spray Spray Spray
We LOVE our sprayer (it’s this one from Graco!) and use it all the time, you can read about how we use it to paint walls here! Spraying paint has got to be one of the most satisfying DIY projects on the planet. The crazy thing is that it goes super fast, each coat of paint took about 4 minutes to apply! Nuts right? A few hours to prep, and less than 10 to actually paint!
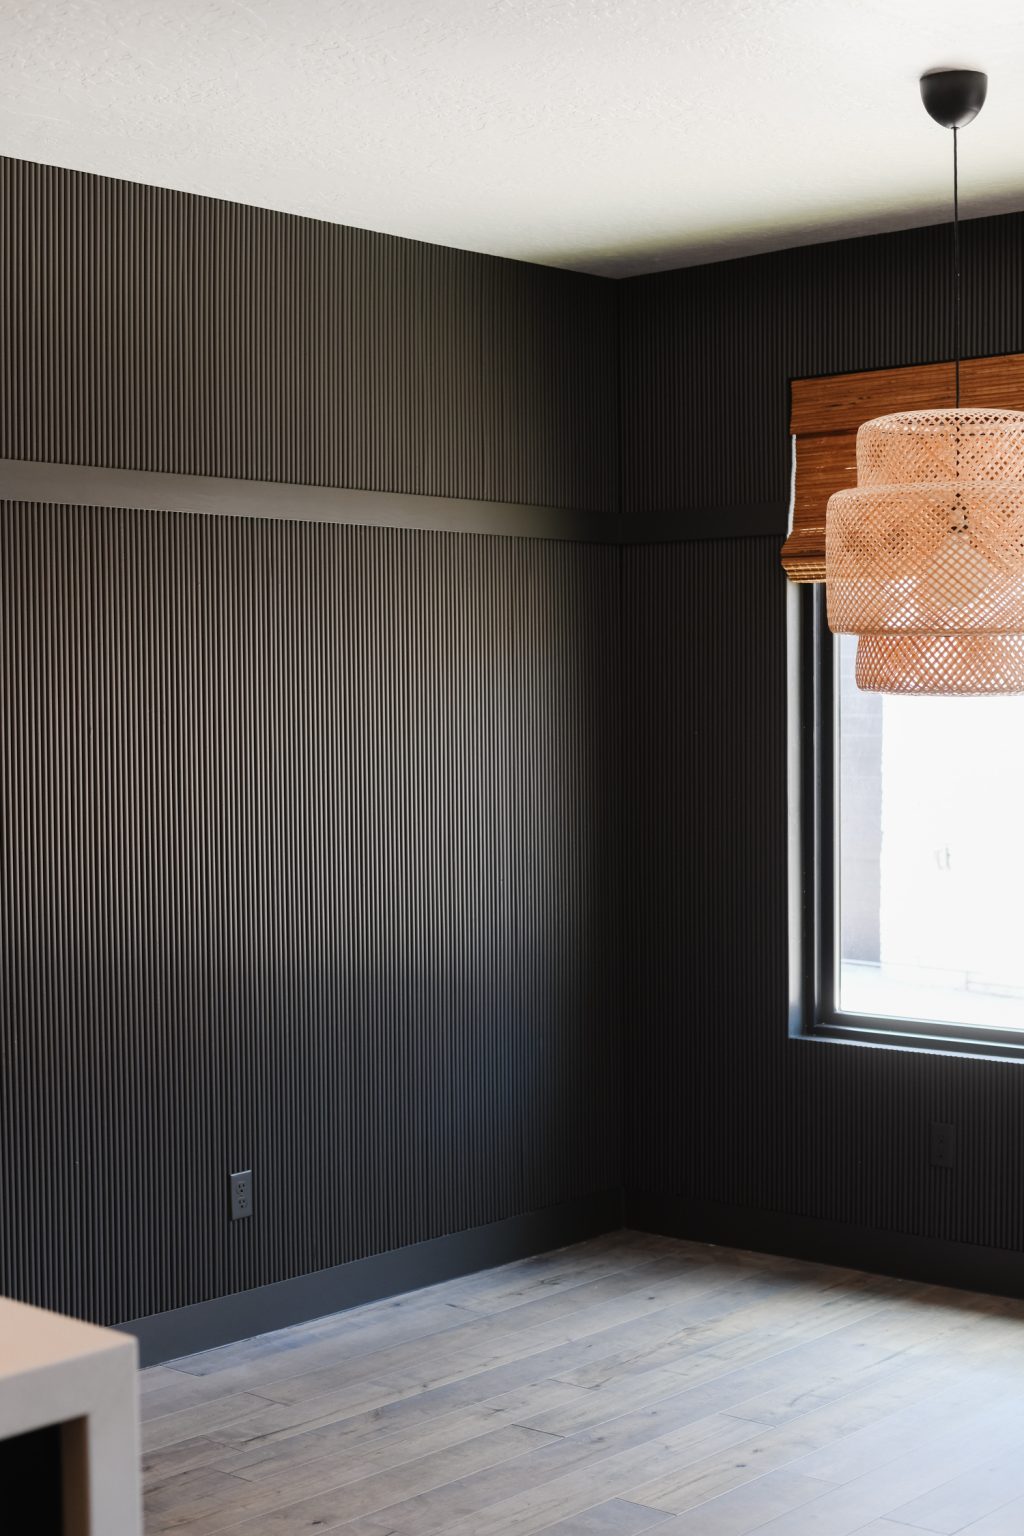
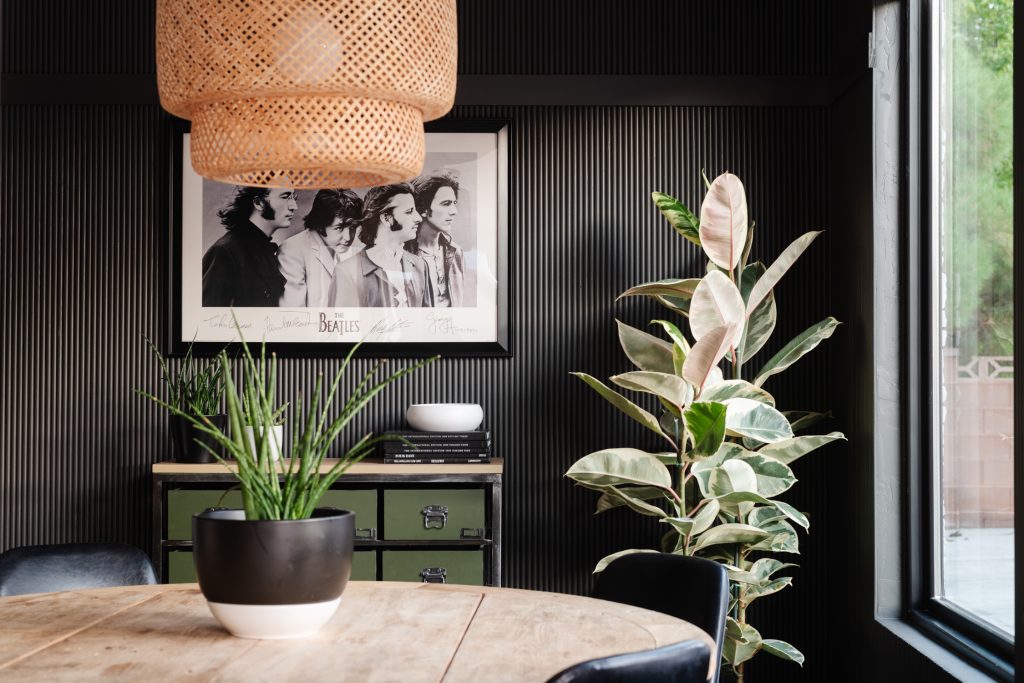
Using the right kind of paint is a big deal, because we were spraying wood and not a drywall surface, we used Sherwin-Williams Emerald Urethane Trim Enamel. You can read why I love it so much here! It’s the ideal paint formula for molding, doors, cabinets, and furniture. The finish I chose is Satin and the color is Sherwin-Williams 2021 Color of the Year Urbane Bronze. I hope that I havent scared you away with all of the usage of the word tedious in this tutorial, I promise it’s doable and just look at the space! TOTALLY WORTH IT!!
The post DIY Fluted Wall Treatment appeared first on Vintage Revivals. from Vintage Revivals https://vintagerevivals.com/diy-fluted-wall-treatment/ from https://summerblakeley.wordpress.com/2020/09/22/diy-fluted-wall-treatment/
This post is sponsored by Sherwin-Williams® Every year Sherwin-Williams predicts what will be the hottest color for the upcoming year, and I’ve been lucky enough to help them announce it for the last 6! We’ve seen everything from bright coral, to almost white, to the perfect navy blue. This year’s color is sure to hit the moody neutral lovers in all the feels. Sherwin-Williams 2021 Color of the Year is Urbane Bronze SW 7048. It’s a dark, warm brown that has moments of gray and green, and it is FIRE! It’s deep and soothing, and just makes any space look calm and inviting.
For our project this year, we took what was going to be a series of small projects, and in true Vintage Revivals style expanded them until they took over our entire lives. Court super loves it when that happens
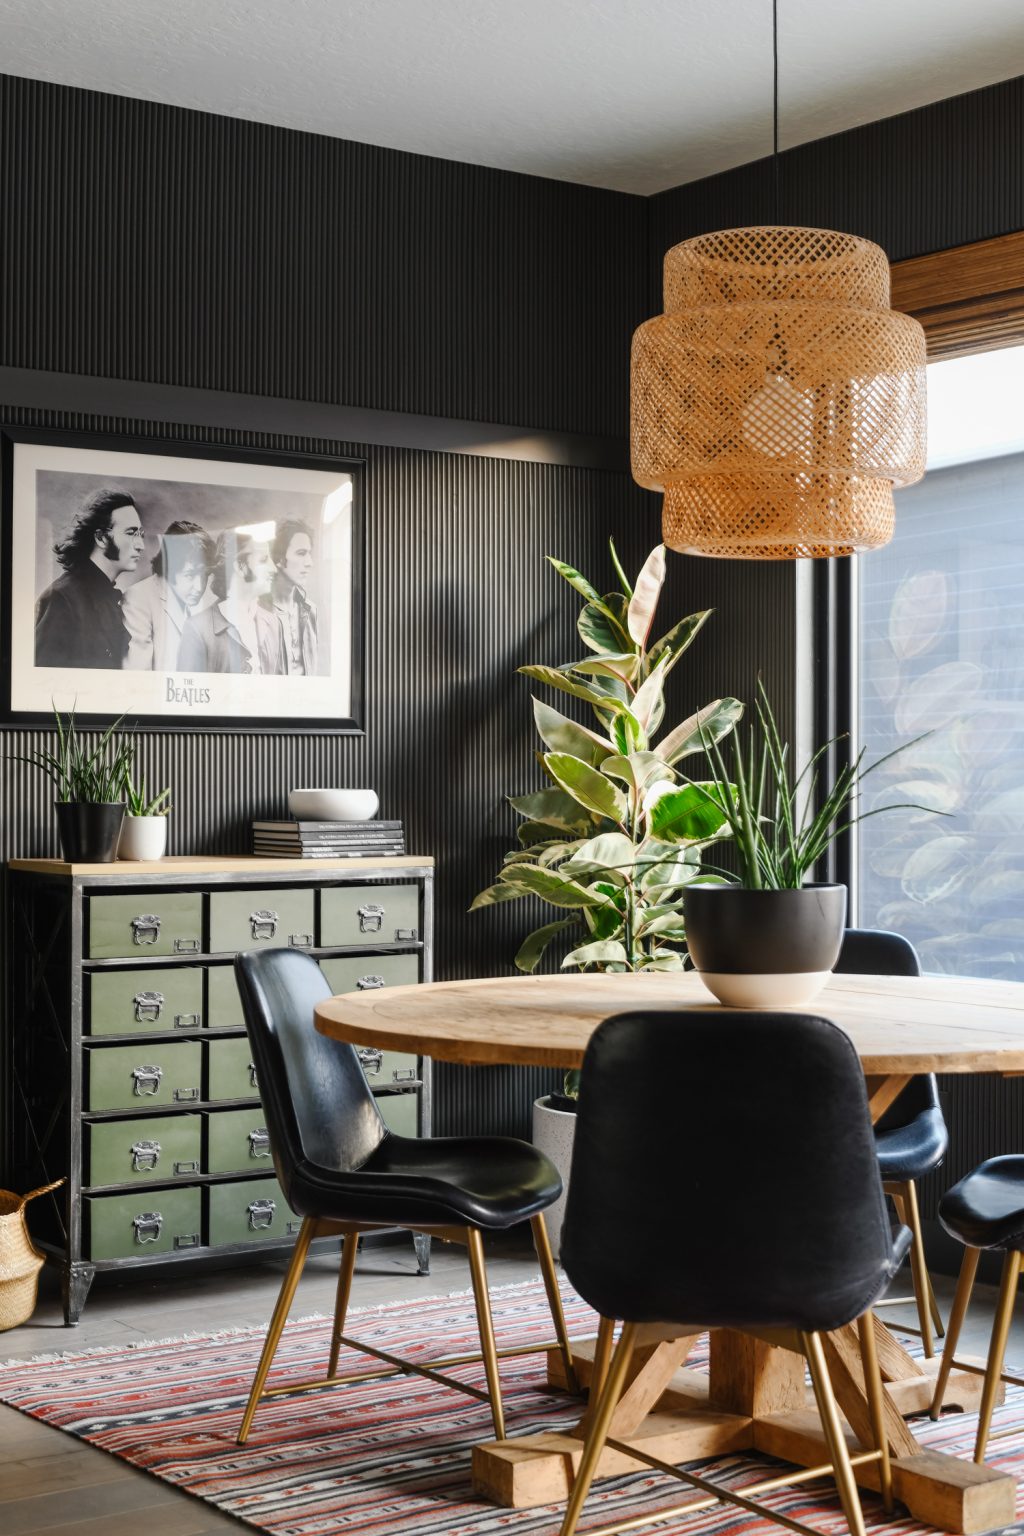
Big: Fluted Statement Wall TreatmentOur first project is a wall treatment that is gaining mega traction in the design space, fluting. Fluting takes a humble half round piece of molding and repeats it until it becomes this insane statement. So insane, that we used literally 5000 pin nails to do this room. Like actually. 5000 nails.
Some of you might remember that my in-laws were building their dream house the same time we were working on phase 1 of the Merc, about 3 years ago. My MIL has great style and when I asked her if we could use her house for this project she enthusiastically agreed.
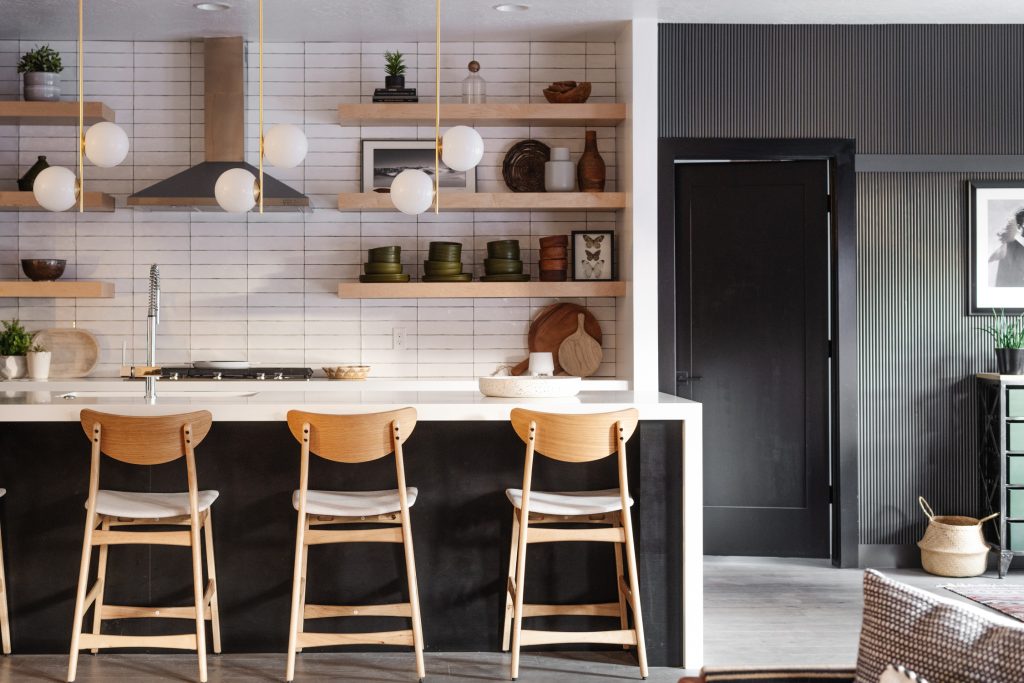
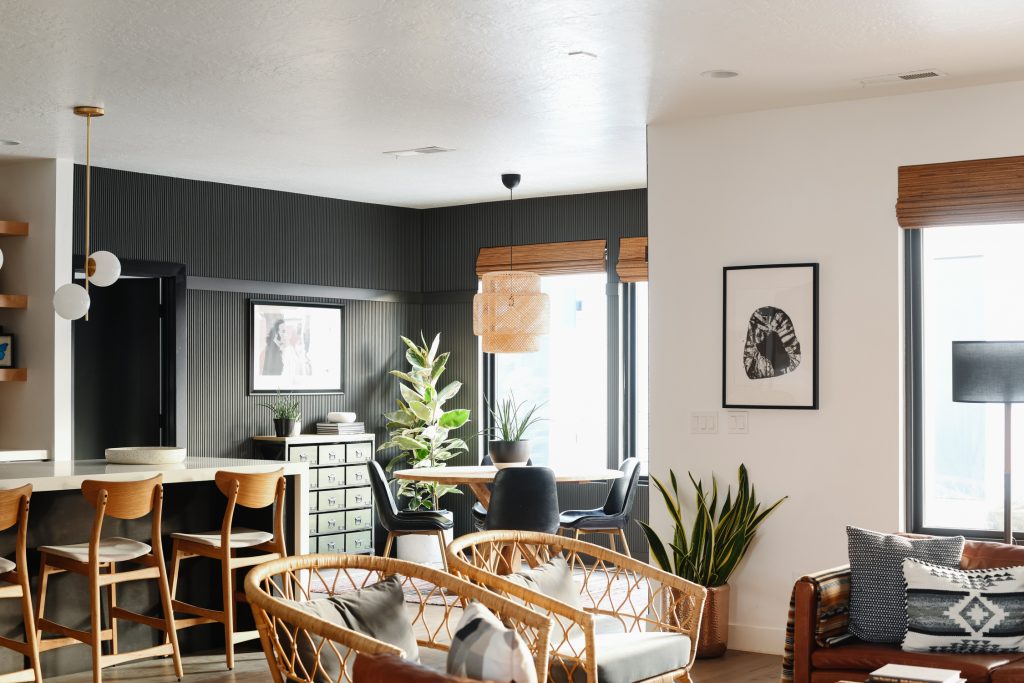
Her space was super neutral, with Mandi White (my secret formula for the perfect white paint) on the walls and Tricorn Black SW 6258 on the doors. I wanted to update the dining area of the kitchen because nothing about it stood out. With all of the walls in the space being the same color and texture, you just kind of didn’t notice it. Fluting added texture, and painting the room Urbane Bronze made it the star of the entire house.
I feel like Urbane Bronze is the perfect moody color for those that love a warmer neutral. My go to dark-but-not-black color has always been Iron Ore SW 7069, but I am feeling the winds of change. Urbane Bronze is warm enough that if you are worried about a space feeling too cool or modern sterile vibes, you can throw those out the window. It’s welcoming and statement-making, especially when you use it in a large way.
For this project, we wanted a flawless finish and opted to use our paint sprayer instead of rolling/brushing it. We used Emerald Urethane Trim Enamel in Satin (you can read my post about how life changing this paint formula is here).
One thing that can keep people from using a sprayer is the amount of prep work that can go into it, especially if you are spraying in a space that is already furnished, but believe me when I say, it is worth it. Yes, we may have spent 3+ hours masking everything off but each of the 3 coats only took 5 minutes to spray and they look perfect!! If you haven’t tried spraying paint, it’s worth it!!
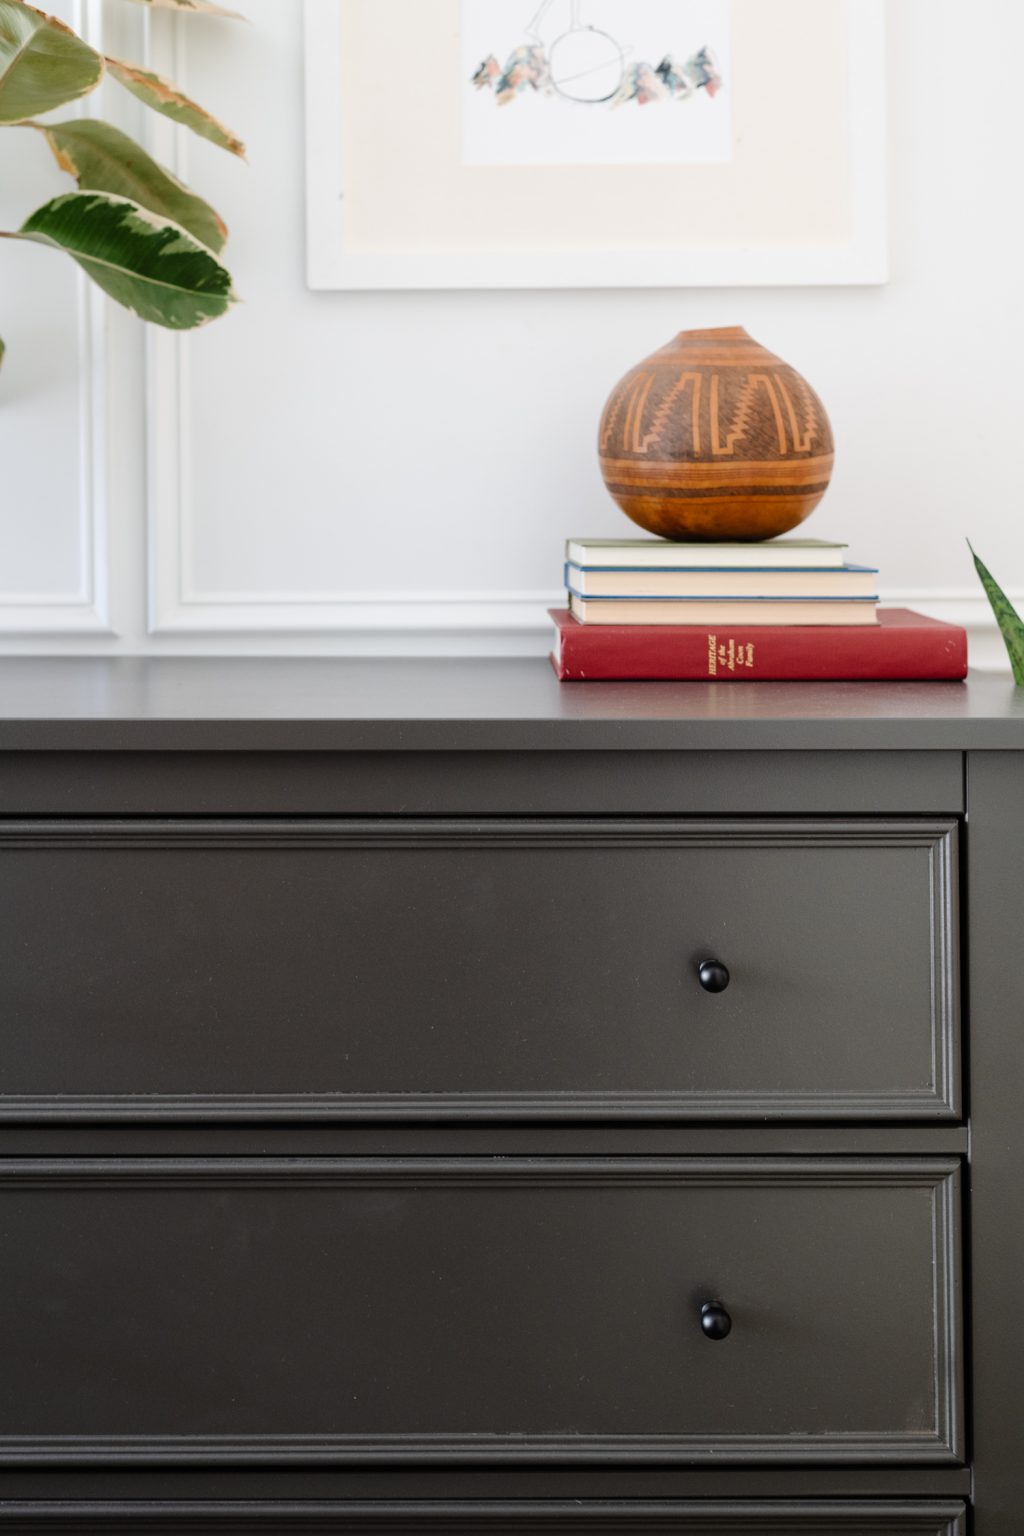
You can check out the tutorial for how to flute a wall here! Small: IKEA Hemnes Dresser HackWho in this world doesn’t love a good IKEA hack?! For this project we took a basic 3 drawer Hemnes dresser and updated it with a little bit of trim, new knobs, and paint!
My favorite style of cabinets are recessed doors/drawers with a small piece of trim on the outside edge. It’s what we did in the Merc, and I think it just looks so good! I’ve got an extensive post on how to paint furniture here, this is awesome if you don’t have a sprayer and you’ll get a smooth finish with a roller! For this project though, we sprayed it, and it took no time at all!
If you’re maybe not 100% committed to painting an entire room Urbane Bronze, a dresser is more your speed. No matter how you choose to do it, adding Urbane Bronze to your home is a MUST. Especially if you favor neutrals, black and white, and natural wood. Make sure that if you head to your neighborhood Sherwin-Williams store, you use the coupon below! You can also use it when ordering online. And don’t forget you can get paint chips delivered for free!
The post Sherwin-Williams 2021 Color of the Year Is…. appeared first on Vintage Revivals. from Vintage Revivals https://vintagerevivals.com/2021-color-of-the-year/ from https://summerblakeley.wordpress.com/2020/09/22/sherwin-williams-2021-color-of-the-year-is/
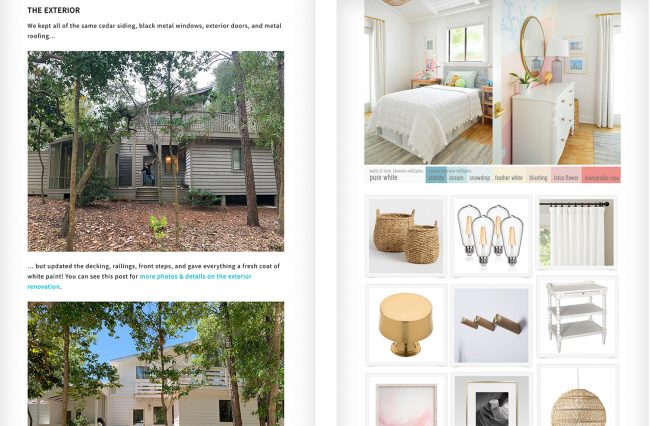
We had other plans for this week’s post, but then Hurricane Sally made her way ever-so-slowly through the gulf and gave us a few solid days of rain, rain, and more rain. Thankfully it was nothing more than that (no power lost, and no flooding for us), which has us feeling incredibly grateful – and we hope everyone who was more directly affected is safe and their homes are ok. Since we couldn’t take the outdoor photos we had planned for an exterior update this week, we realized we should build two blog pages that had been sorely missing for the last, oh, four months. So to everyone who has been asking for those, we finally made them! First, we’ve got a brand-spankin’ new Before & After page for our house here in Florida. Click HERE to see it. “After” may be a bit presumptuous since none of our spaces have reached what we believe will be their “absolute final stages” (it has only been 4 months!) but they’ve all come so far – and we have to admit that they feel extremely good to us already! from Young House Love https://www.younghouselove.com/sources-page-for-florida-house/ from https://summerblakeley.wordpress.com/2020/09/17/befores-afters-and-sources-for-our-current-house-so-far-at-least/
Summer is coming to an end — but that doesn’t mean you should give up and let your garden go for the year! The colder season signals that it’s time to prepare your green space for winter and find alternative ways to keep your favorite plants in your life. Keep reading to ensure you’ll be ready when the temperatures drop.
Don’t dig up your perennials just yet! While it’s true that they’re prone to being taken by frost, if you take enough precautions, you should be able to conserve them and plant seeds for a beautiful spring bloom. Be sure to tackle weeds to preserve the soil and add mulch to protect them from the harsh winter wind. Six months later, you’ll be glad you took these extra steps! For fall planted bulbs such as tulips, daffodils, and hyacinths, be sure to fertilize with Espoma Organic Bulb-tone.
Raking those autumn leaves can sometimes feel like a never-ending chore. But it doesn’t have to be that way. In fact, you should start to look at them as a benefit. You can actually mow the dead leaves and create a makeshift fertilizer for your soil. This will lessen the burden of cleaning up every time there’s a strong wind that knocks a pile of leaves loose and benefit your soil. To show your lawn a little extra love, check out these premium organic lawn fertilizers.
Colder weather doesn’t have to mean barren backyards. Fall is actually a great time to plant trees and shrubs! While the weather is cooling off, the soil is still warm enough for the roots to develop in them. After planting, they will go dormant as the soil cools. Just be sure to water them beforehand so they’re ready to jump back to life in the spring.
Contrary to popular belief, the vibrant flower garden of your dreams can still be a reality even during the harshest winter months. A technique that forces bulbs to bloom indoors can help you bring it indoors! So while it may be a pure white winterland outdoors, your windowsill can still brighten up your day.
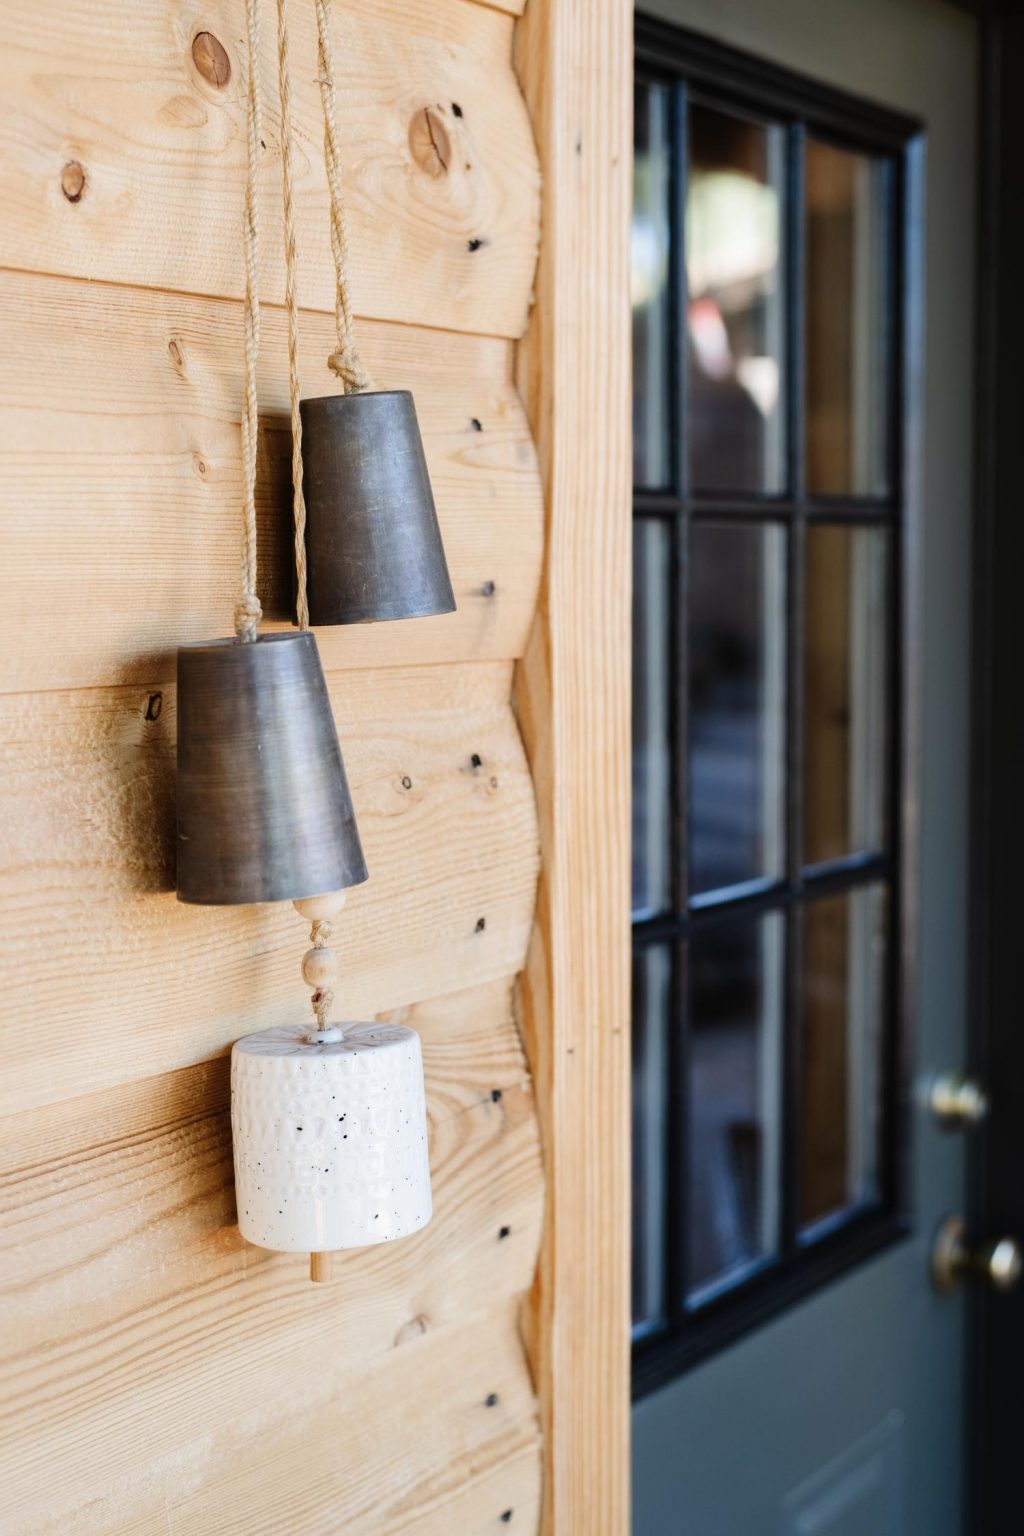
Before you pack everything up for the season, be sure to give your tools a good cleaning. Wash off any excess dirt to avoid returning to rusty tools in the spring. You can also coat your metal tools in vegetable oil to avoid cracking from the harsh, cold weather. Lastly, sharpening your pruners and loppers so that when you’re ready to use them again, you’ll be pleased to find tools that feel like they’re brand new! Do you feel ready to face the coolers months yet? All it takes is some diligence and Espoma knowledge to be prepared for the winter and ready for a strong comeback in the spring. So grab those gardening tools and start today. from Espoma https://www.espoma.com/fruits-vegetables/uncategorized/a-checklist-for-fall-garden-maintenance/ from https://summerblakeley.wordpress.com/2020/09/16/a-checklist-for-fall-garden-maintenance/ This post is sponsored by GREAT STUFF TM They say that owning a cabin means endless projects. They are correct. Every summer we tackle something at our family cabin (last year it was a 10 day kitchen renovation) this year, our biggest priority was sealing the interior off to critters.
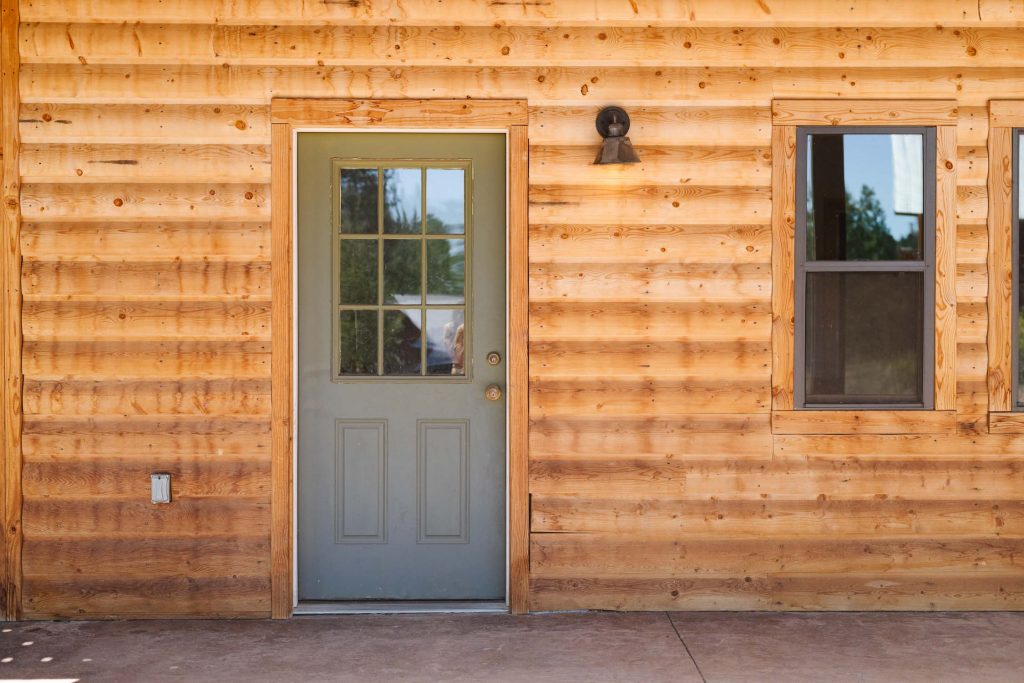
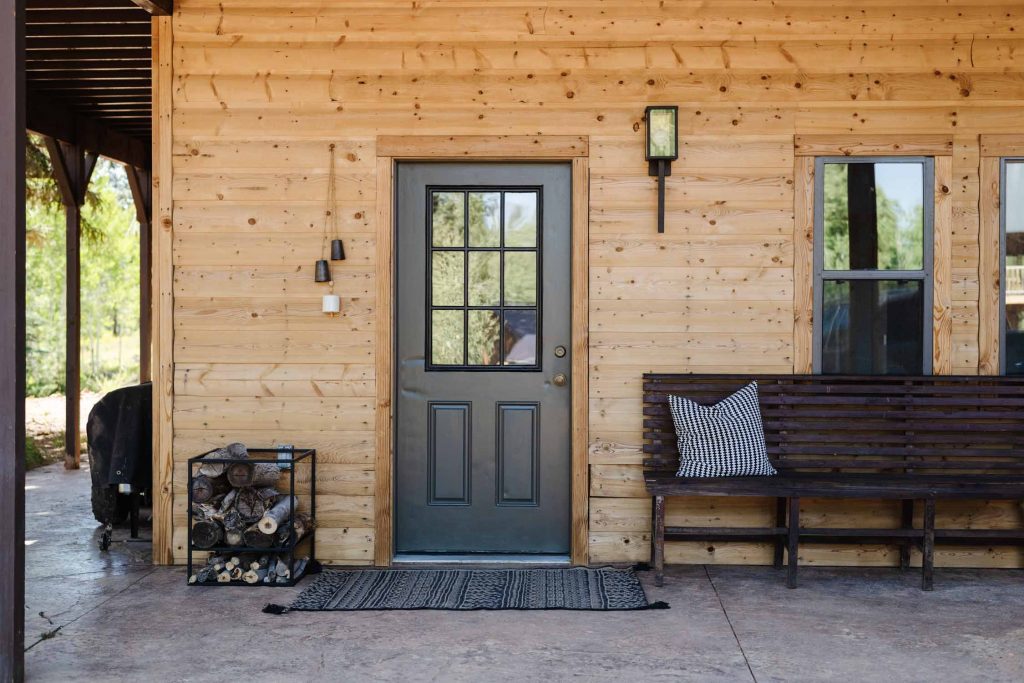
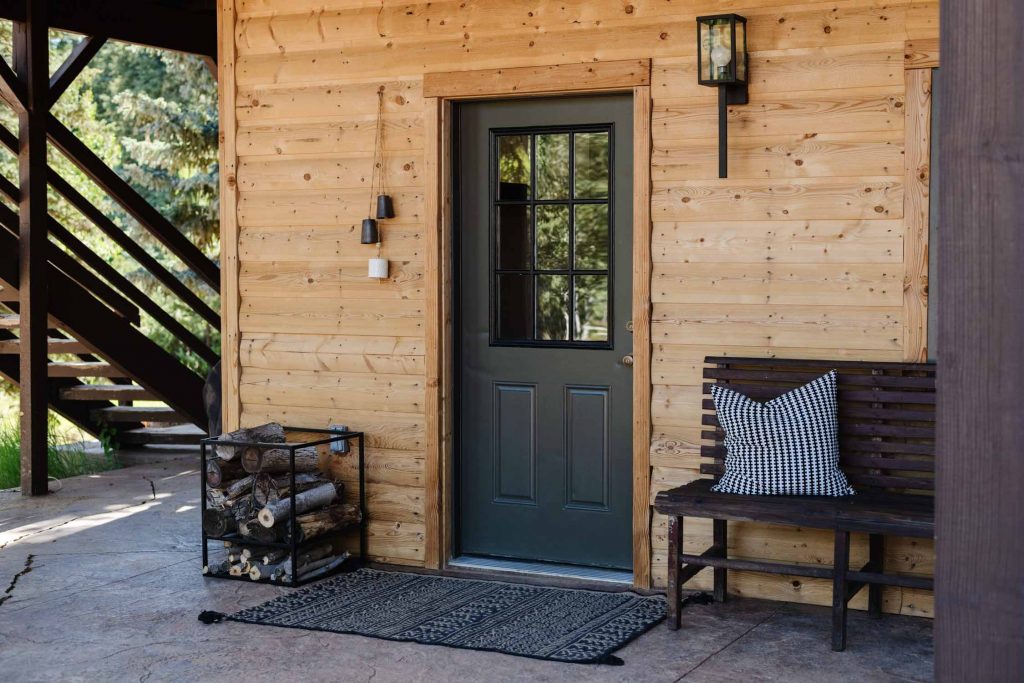
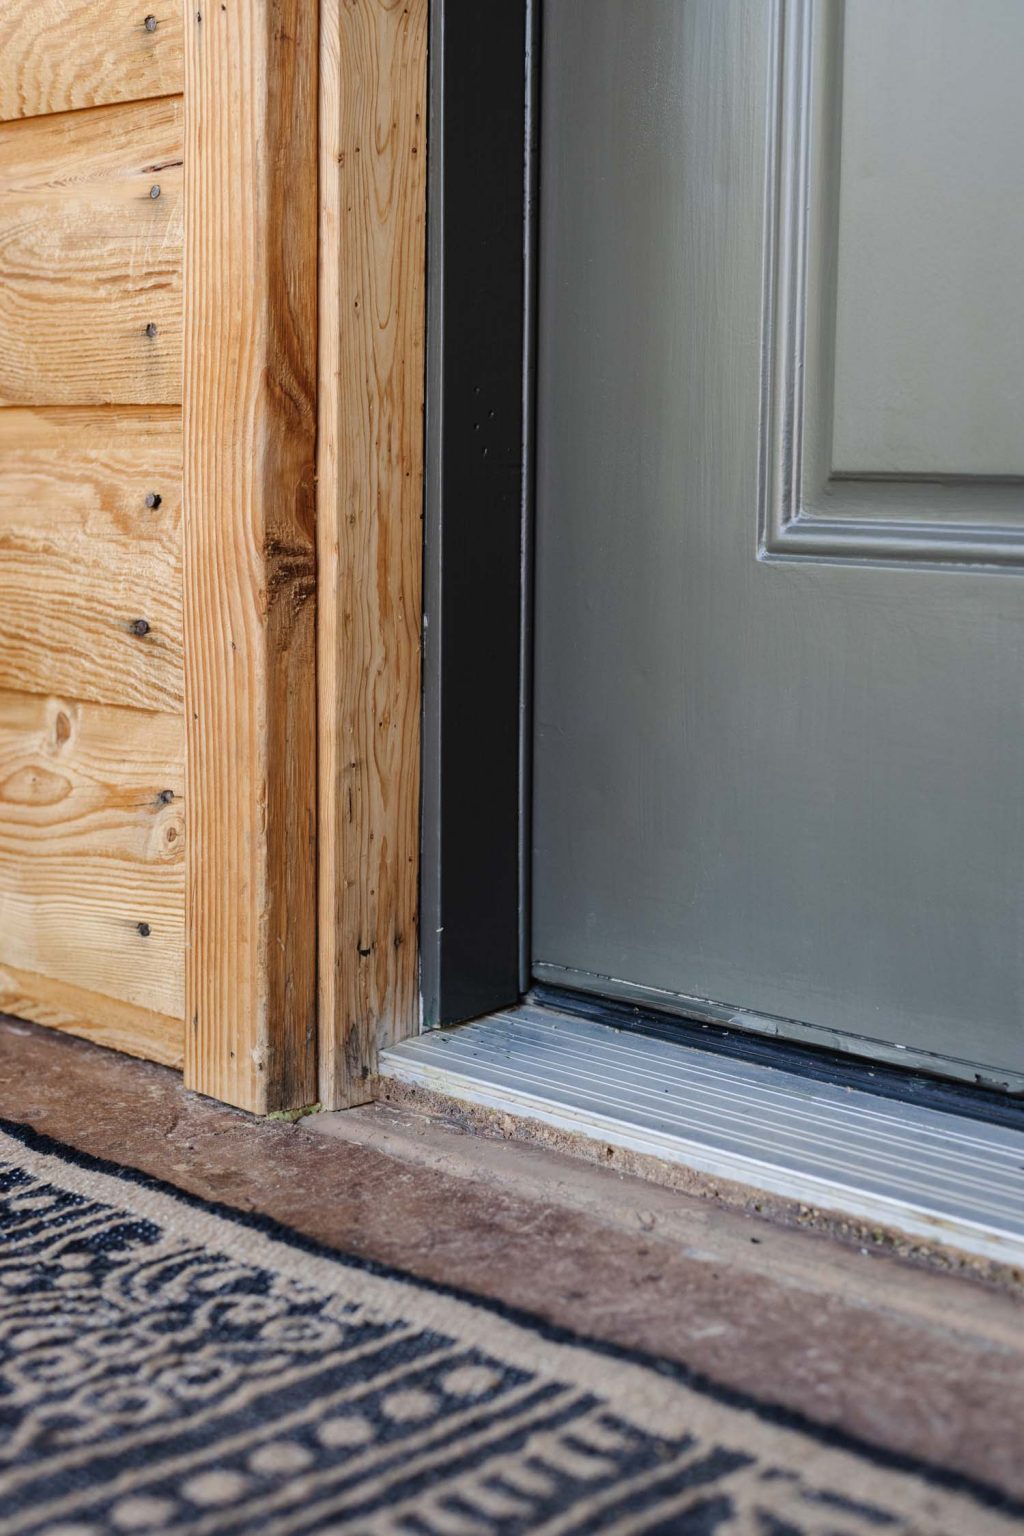
I have childhood trauma of seeing a mouse run across the floor at my family cabin, and we’ve seen evidence of them (you know what kind) at Court’s family cabin sporadically. But this project jumped to the top of the to-do list when we were casually hanging out on the patio and witnessed a full grown rodent run along the base of the wall and right under the door threshold. Nope. That is not ok. Upon further examination we were shocked to find that the threshold opens into the cabin like a big fat welcoming gate. As much as I hated thinking about mice, I was so glad that we could see where they were getting in!
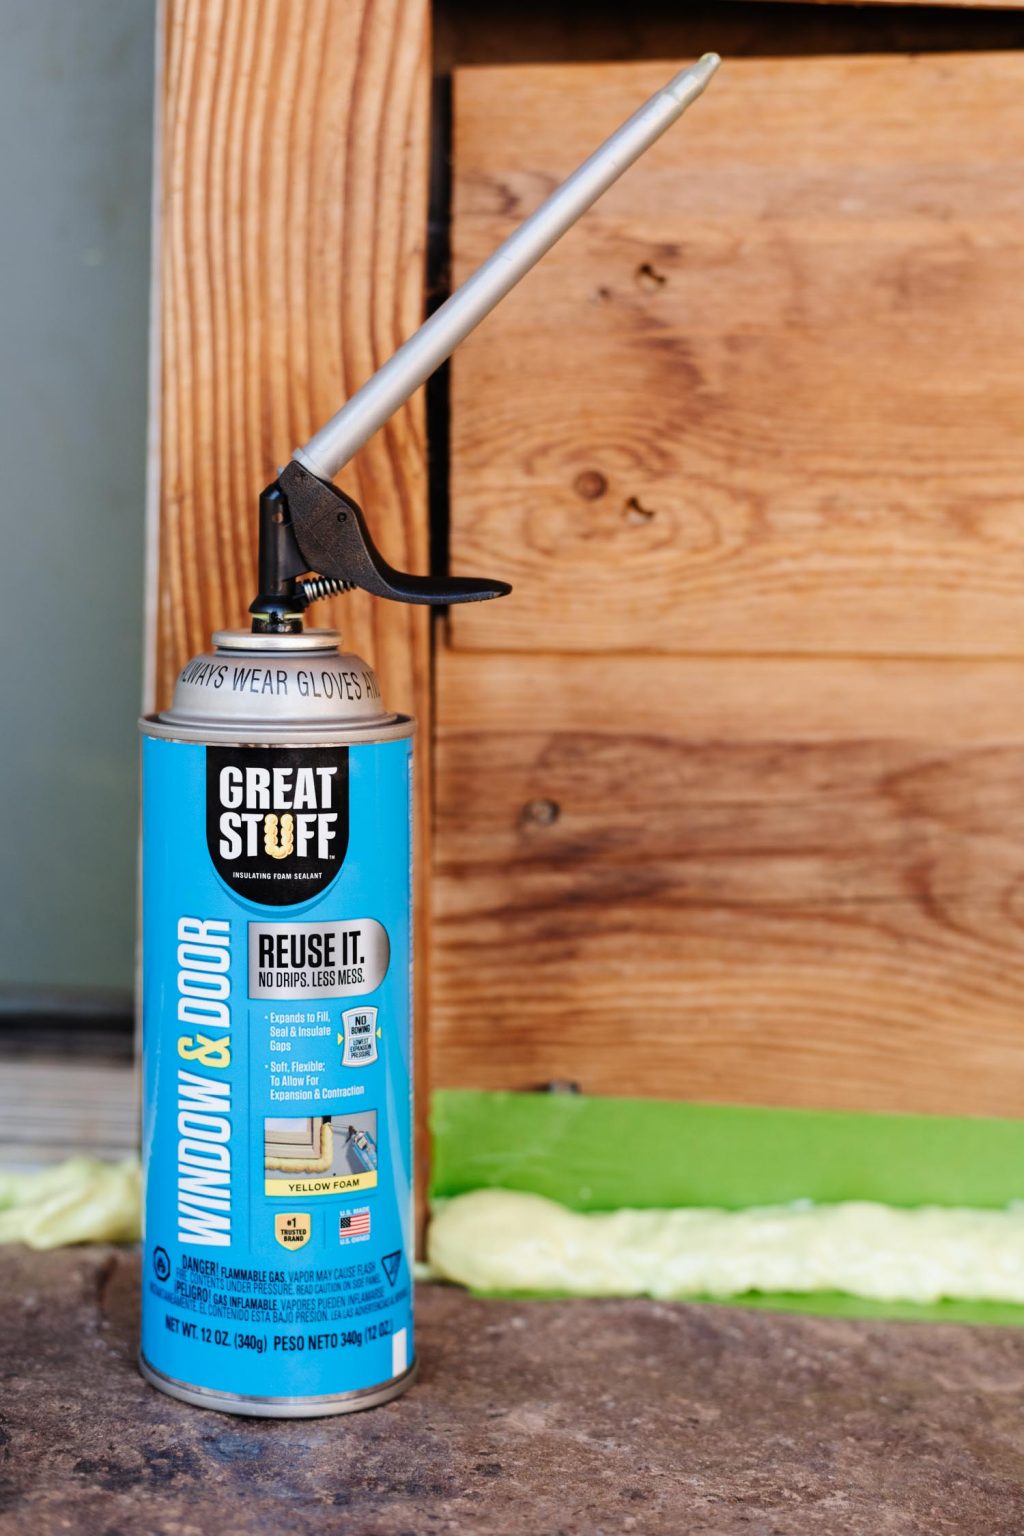
I about fell out of my chair when GREAT STUFFTM reached out about partnering on a project. I don’t know if there was ever a more serendipitous email. GREAT STUFFTM to the rescue! We took the creative liberty to update the patio space AND prevent our little unwanted guests. GREAT STUFFTM is an insulating foam sealant, It’s an absolute necessity when it comes to any type of project that needs to be sealed. Think air leaks, pests, insulation gaps, if there is a hole, GREAT STUFFTM is your bestie. They recently launched a new Smart Dispenser that Court is level 10 excited about.
See previously, once you started using GREAT STUFFTM, you had a small window of time to complete the job before the straw sealed itself off. With their new straw design you can store and reuse GREAT STUFFTM for an actual month!! (you’ve got to watch the video at the end of this post to see Court’s thoughts on this Now, I wish that I could say that this project went exactly as planned, but where is the fun in that? DIY disasters are waaaaayyyyyy funner to read about.
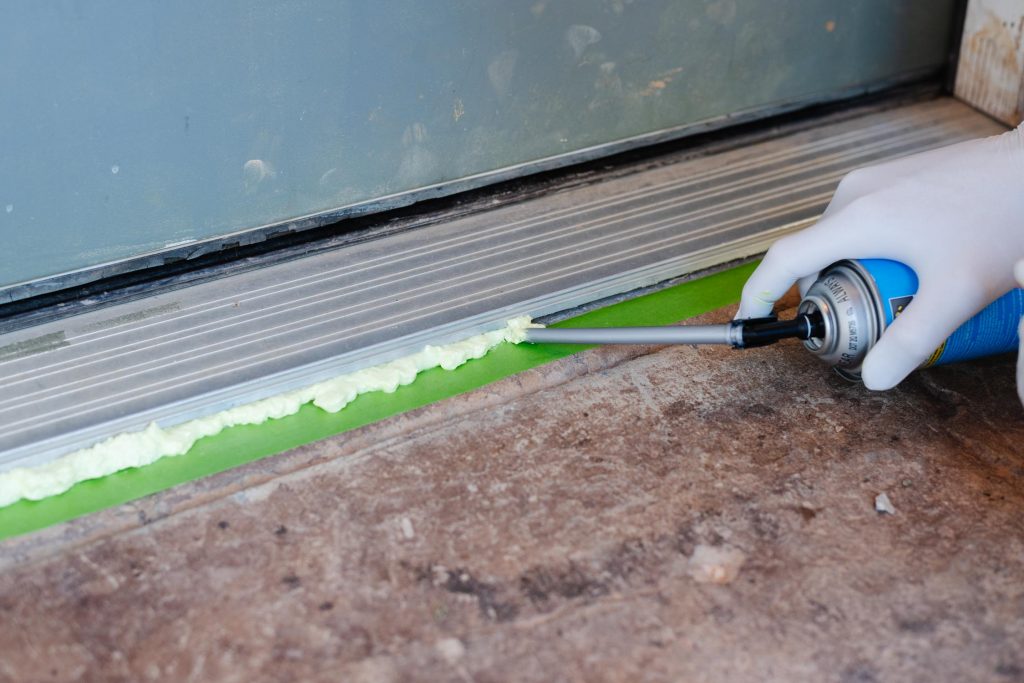
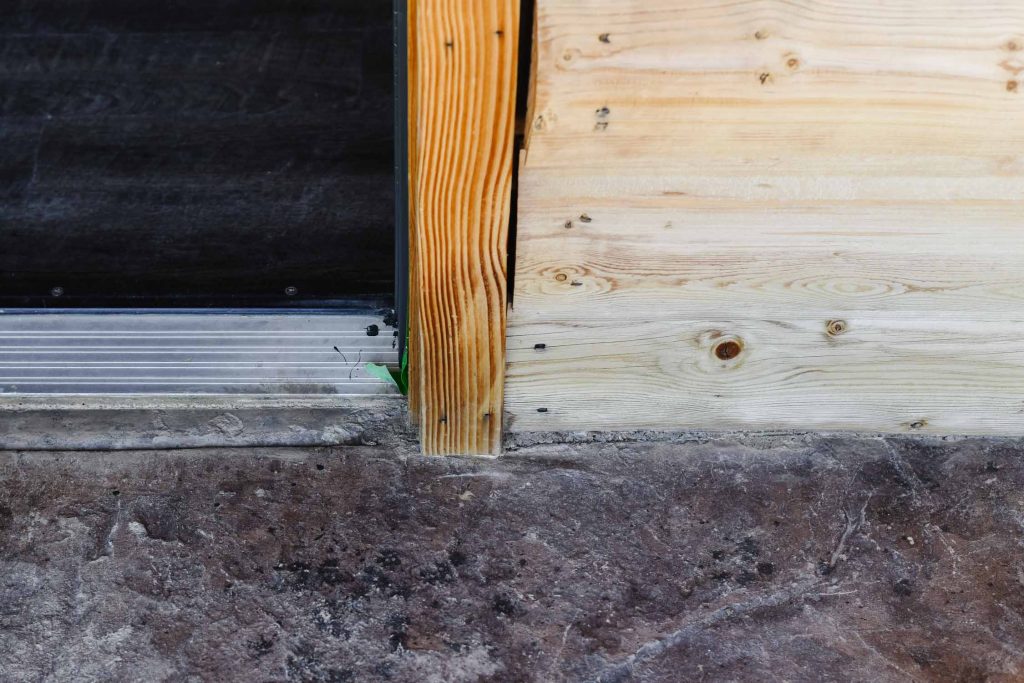
We thought that this quick porch update would take a day or so, boy was that cute. The entire thing went sideways when my paint color was wrong, but I’m getting ahead of myself… We started by prepping the gaps for GREAT STUFFTM by blowing them out with a leaf blower, we were dumbfounded when we put the blower against the baseboard on the inside of the house and dust and debris went flying out of the cracks in the exterior. WHYYYYY?! After we scraped off the caulk and blew out all of the cracks we could see how truly cavernous the space was. We taped off the sidewalk with painters tape to make sure that the foam sealant only stuck to the space underneath the threshold and in the crack to the right of the door. Using GREAT STUFFTM is as fun as you think it will be. Just make sure you are using protective eyewear, long sleeves, and gloves.
Court said that filling the cracks was (and I quote) “The best thing I’ve done all month.” We learned that it’s better to fill the space quickly without releasing the trigger. If you release it and then start again it’s possible to blow a larger air-pocket into the gap that sometimes doesn’t get filled completely. The more experience you have under your belt the less likely this is to happen.
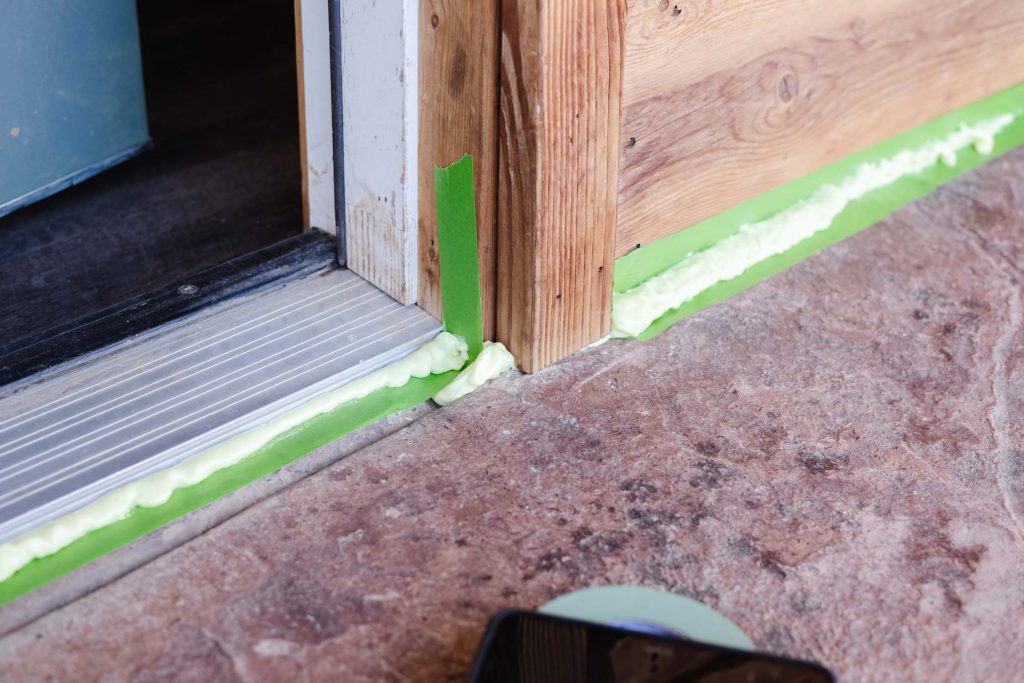
After we filled the space under the threshold, we waited about 30 minutes before we filled the gap to the right of the door. Court wanted to see how much the foam had expanded, and test out the new Smart Dispenser.
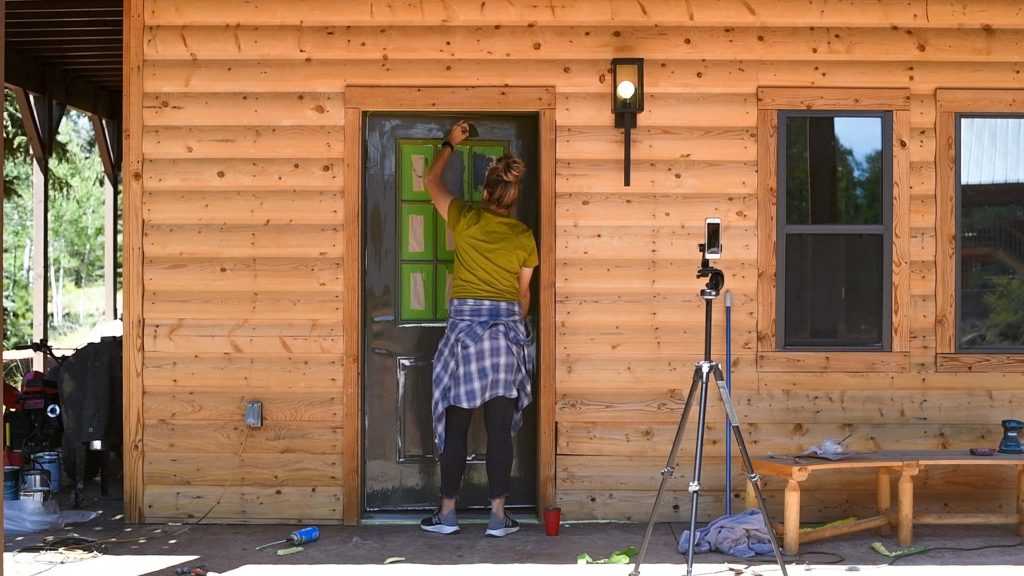
No surprise that it worked like a charm! GREAT STUFFTM needs to cure for at least 8 hours before it can be trimmed, so while we waited I started painting the door.
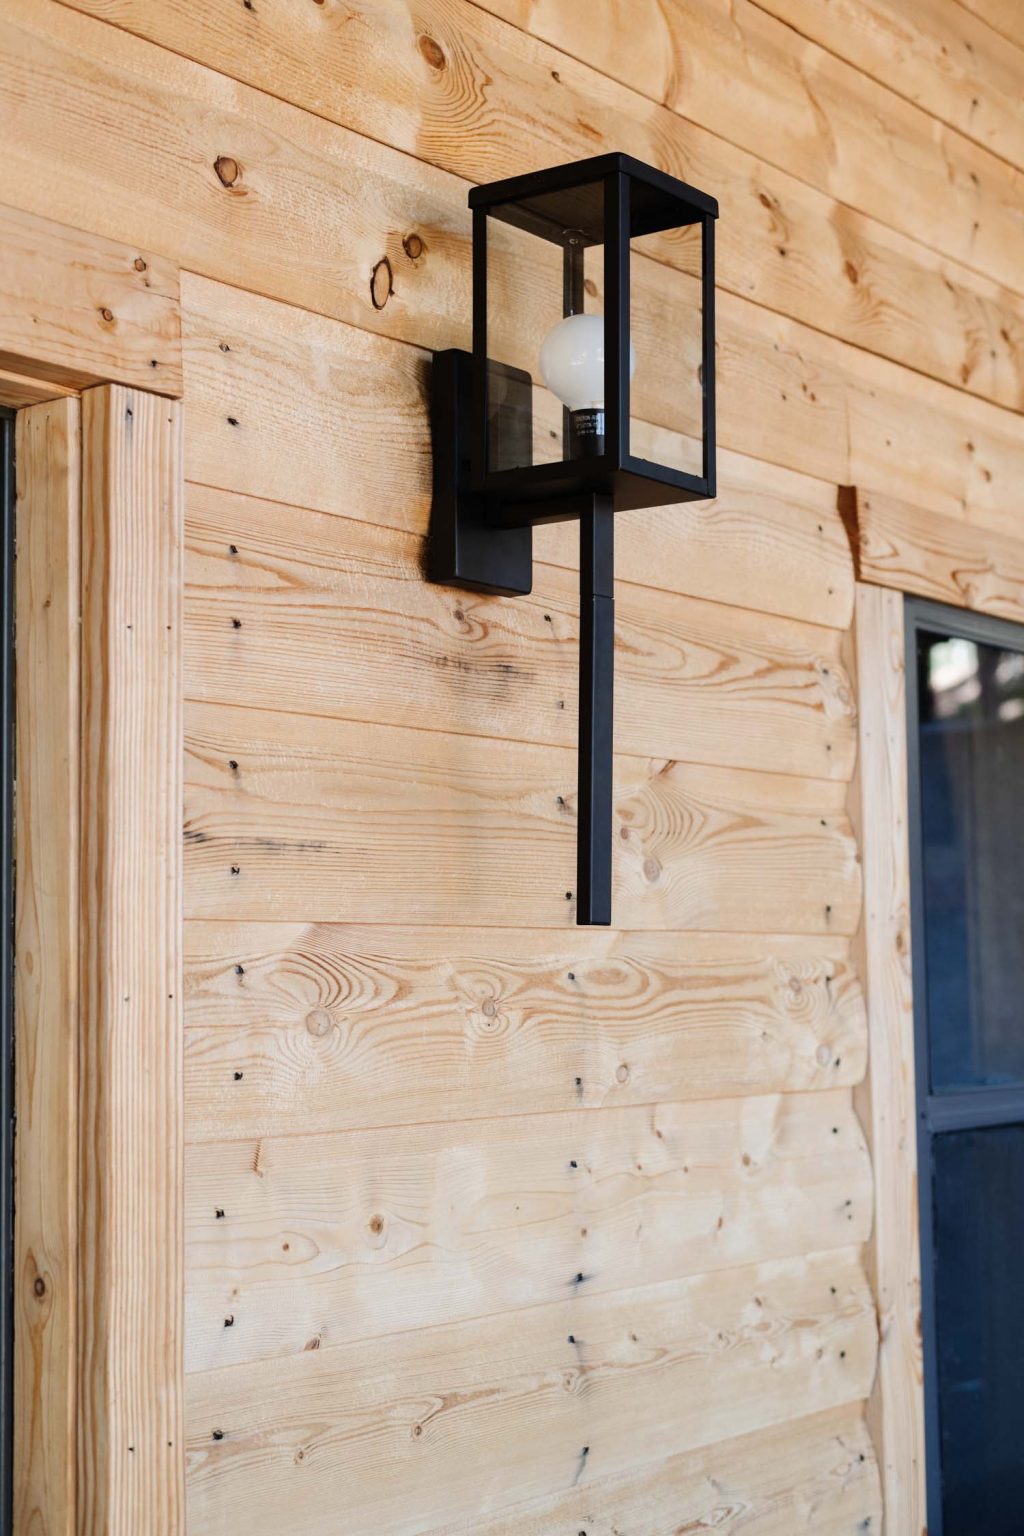
The plan was to use Ripe Olive (I used it in this bathroom makeover and have loved it ever since!) but as soon as I got it up on the door jamb I knew that it was all wrong. The orange tones in the wood made it look to blue and it reminded me of a phase I went through in middle school where I loved moose decor. Not a great look. So I went back to the drawing board and brought home a color that is similar to pea green. It was actually not a bad color, the problem was that it was the same tone as the cabin. I needed variation. Color #3 was the love child of color #1 and color #2. It was SUPER similar to the color already on the door. Which isn’t a bad color, but I wanted to change things up a little. Color #4 wasn’t great either so I decided to try color #5…Mandi White. I got about half way done with the door and hated it. At which point I was frustrated, exhausted, and NOT a happy camper. So we decided to head home and regroup. I picked out a new light at Home Depot, and grabbed an old end table to repurpose, as well as my trusty Tricorn Black paint. Now, you might be wondering why we didn’t just paint the door black, it seems like the obvious and awesome choice. Believe me when I say that would have been great if it wasn’t for the fact that the entire wraparound porch and stairs are all dark brown. It would have fought with the existing exterior, and while it would’ve looked good in a cropped photo, that isn’t what we’re going for. Back at the cabin I started mixing colors and finally came up with the perfect shade of green. Darker than the previous color, and a little muddier, it was awesome. It also didn’t hurt that we power-washed the logs to clean off the red dirt and some of the crumbly orange sealer.
Have you ever seen a more beautiful door?! lol this is real life folks.
With the right color on the door (finally!) and the window trim painted Tricorn Black, I was able to turn my attention back to the GREAT STUFFTM!
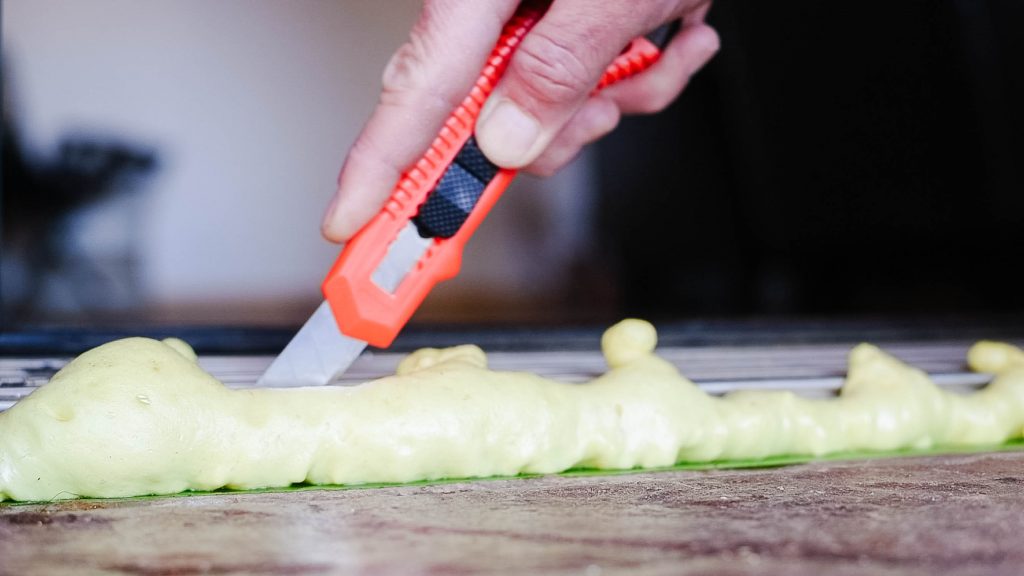
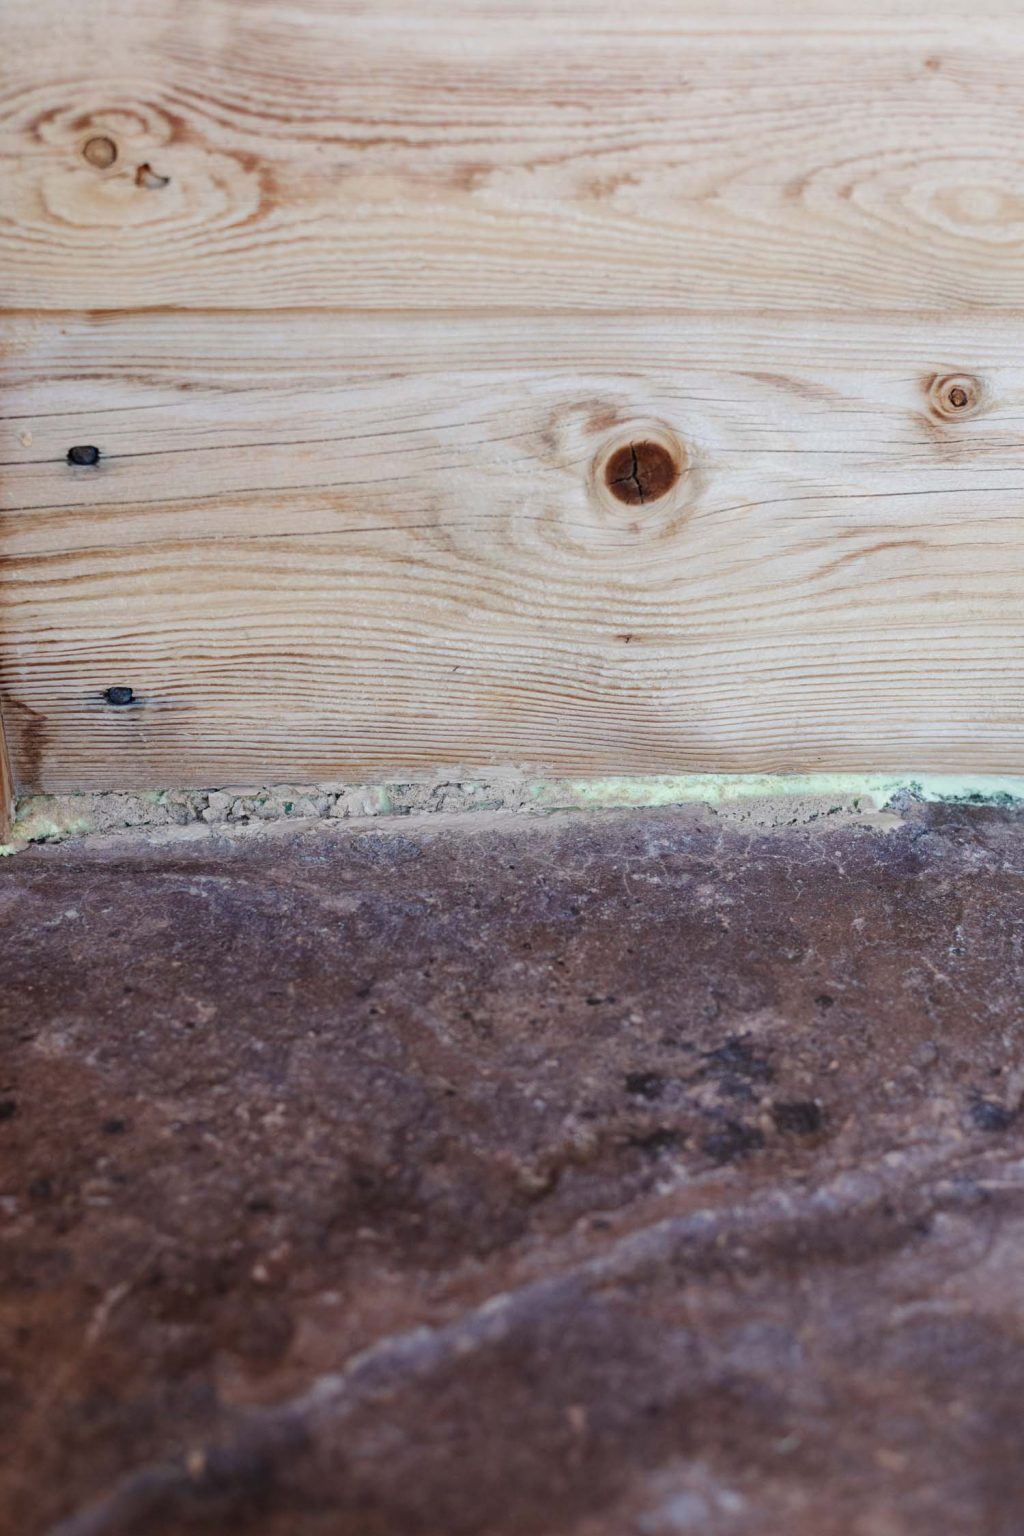
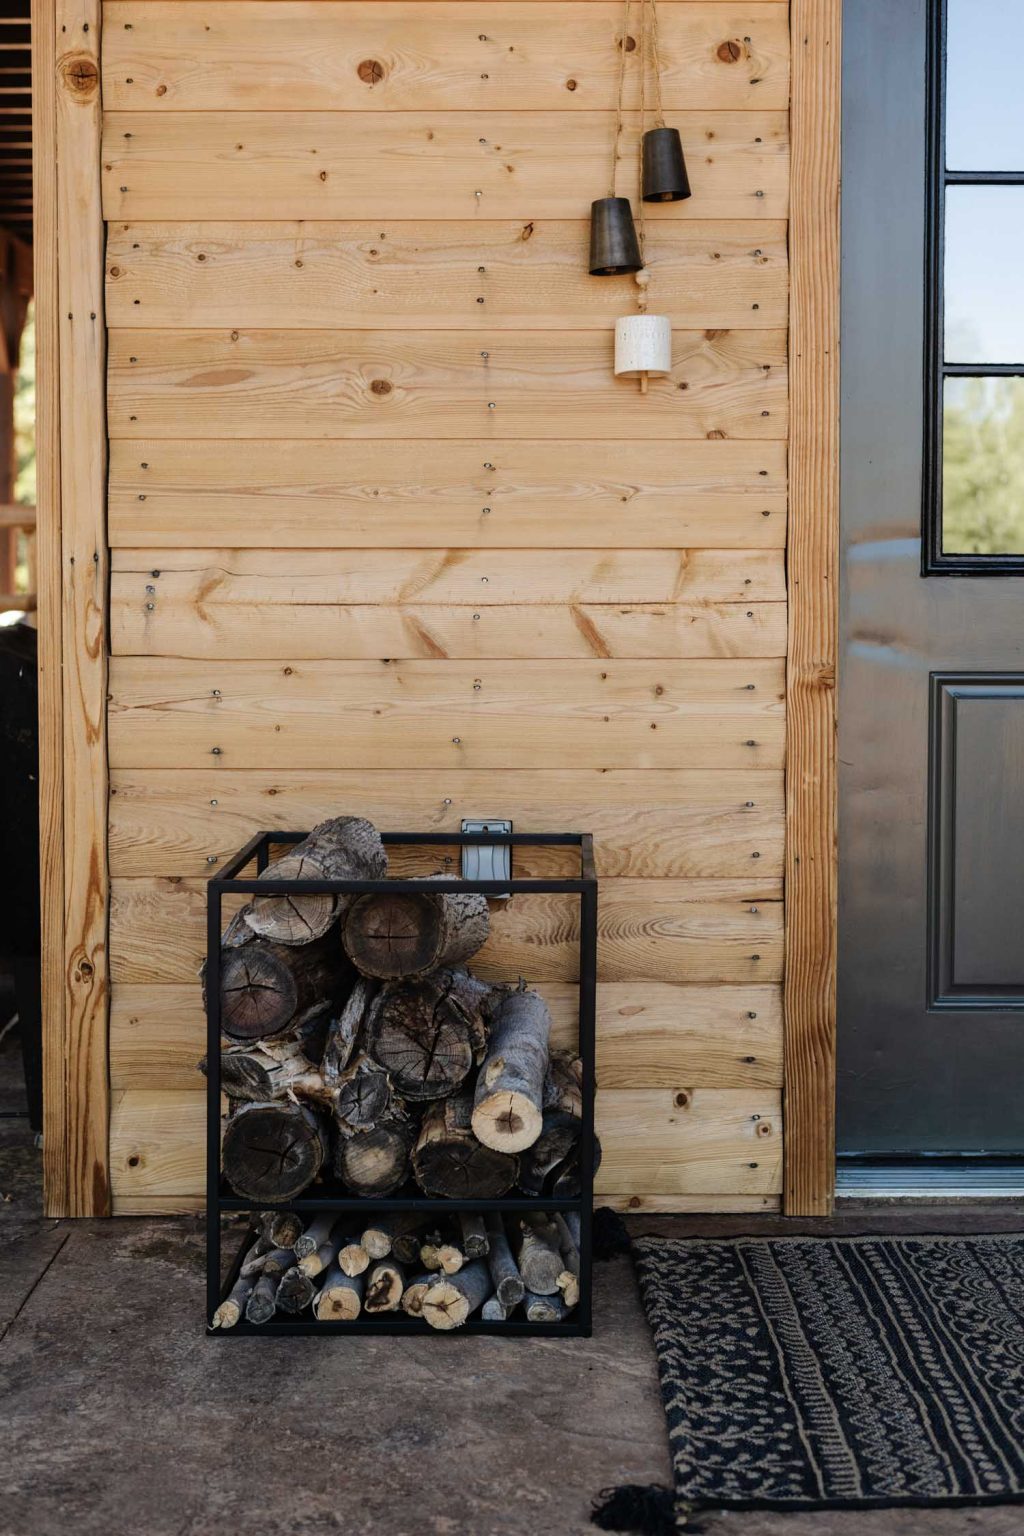
We used a razor blade to slice the excess foam off (like butta). The best part about GREAT STUFFTM is that it’s paintable! I used 2 different shades of brown that matched some of the color in the stained concrete, as well as a touch of Tricorn Black to disguise the foam, and it worked better than I could’ve ever hoped! With all of the grief that the door color was giving me, I was grateful that this part of the project was so simple!
With a few decor touches, the space is done and looks awesome!!
I’m not going to lie though, my favorite part is something not a soul will even notice, the Great Stuff that is protecting our cabin from pesky mice. Now I don’t know who Court is going to blame for the middle of the night missing cookies on. You can find Great Stuff with the new dispenser on Amazon and at your local Lowes! Watch the video below to see this whole project in real time, with Court commentary and everything. Technically it’s possible to start and stop for highly experienced appliers. [CB1] The post Cabin Porch Makeover appeared first on Vintage Revivals. from Vintage Revivals https://vintagerevivals.com/cabin-porch-makeover/ from https://summerblakeley.wordpress.com/2020/09/11/cabin-porch-makeover/
If you’ve followed along for a while you’ve seen our bedroom fireplace get a few updates over on Instagram Stories, but today we’re telling the whole sordid tale of how our update ideas recently veered off-course (and how we ended up at Plan B when Plan A went bust). Last time you saw it on the blog, it looked a little something like this: similar stools |art | frame for art | similar rug | similar pot | wheeled plant stand But we should rewind for a second. It was pretty bleak looking when we first started Operation Revive The Fireplace. There was a bunch of dried glue and gunk leftover from some tiles that had once covered the surround (not to mention a rusty screen and general grime). But Sherry had that look in her eye that said “don’t second guess me, this is going to work” and after nearly a decade and a half of marriage I have learned not to question this look. from Young House Love https://www.younghouselove.com/crystal-fireplace-logs/ from https://summerblakeley.wordpress.com/2020/09/10/how-our-fireplace-makeover-plan-got-squashed-and-how-we-pivoted/ Starting a fun new succulent project? Take a tip from Garden Answer and kick things off with Espoma Organic Cactus Mix, which is made specifically for cactuses and succulents.
Featured Products:
from Espoma https://www.espoma.com/espoma-videos/video-arranging-succulents-in-an-urn-with-garden-answer/ from https://summerblakeley.wordpress.com/2020/09/10/video-arranging-succulents-in-an-urn-with-garden-answer/ |


 So here are two fun ways to use the 2021 Color of the Year – one big and one small.
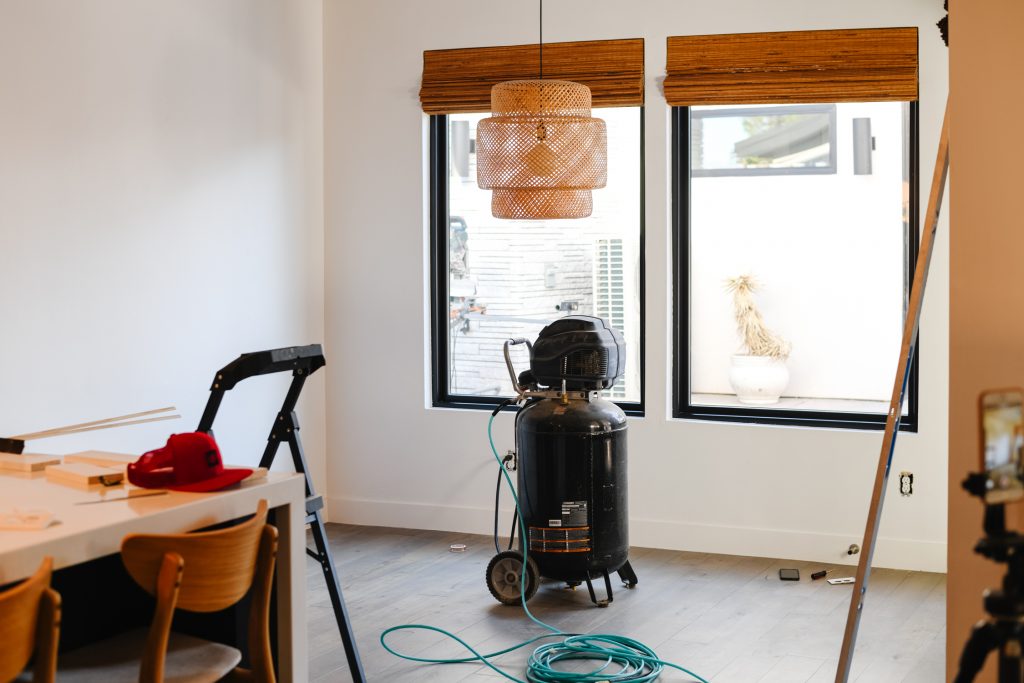


 RSS Feed
